Leaderboard


Popular Content
Showing content with the highest reputation since 06/07/24 in all areas
-
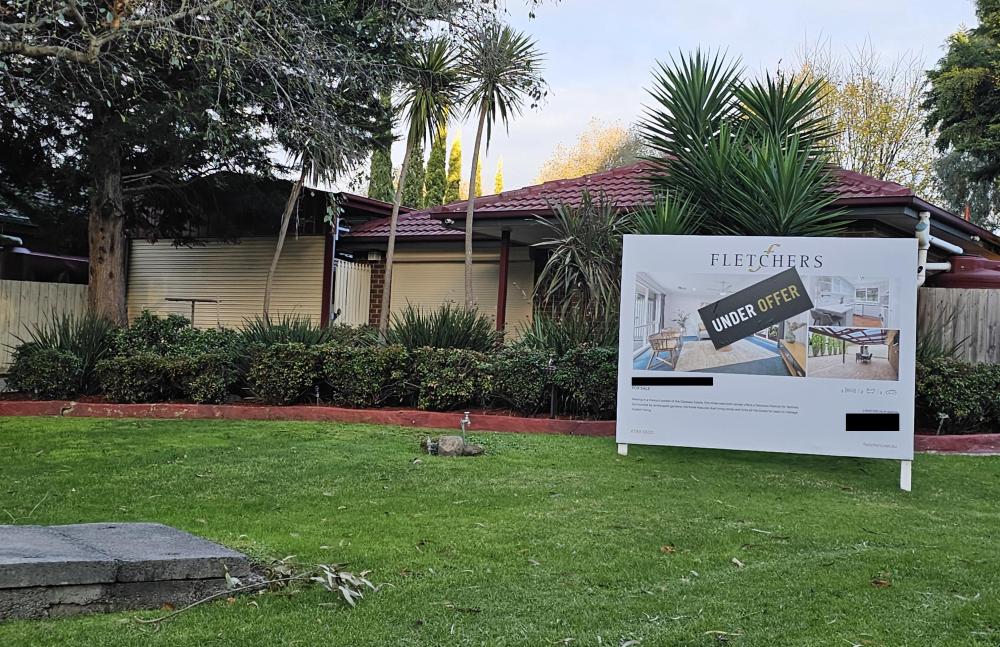
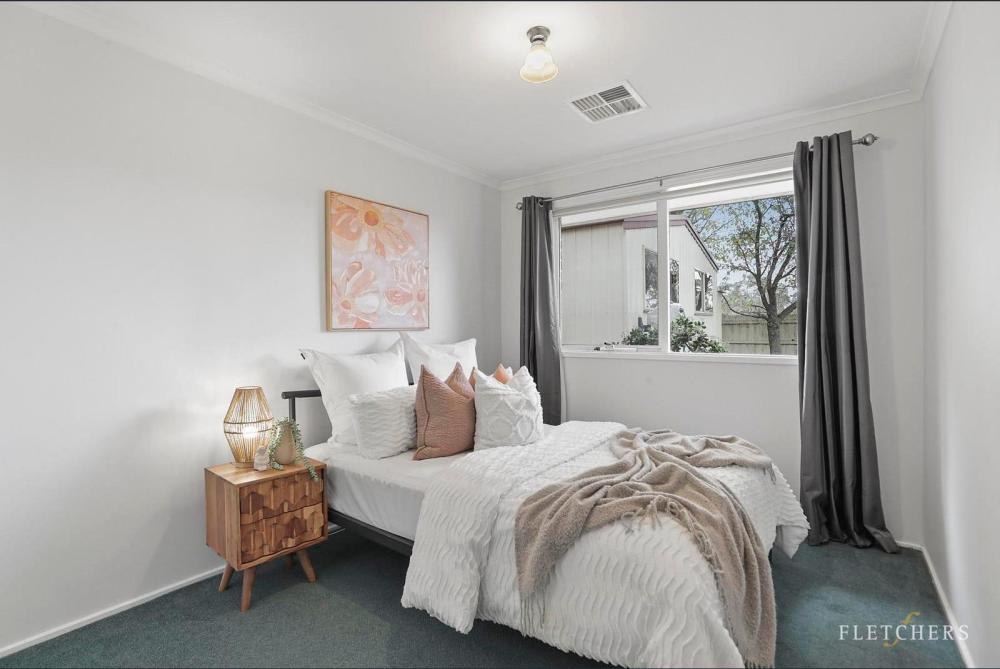
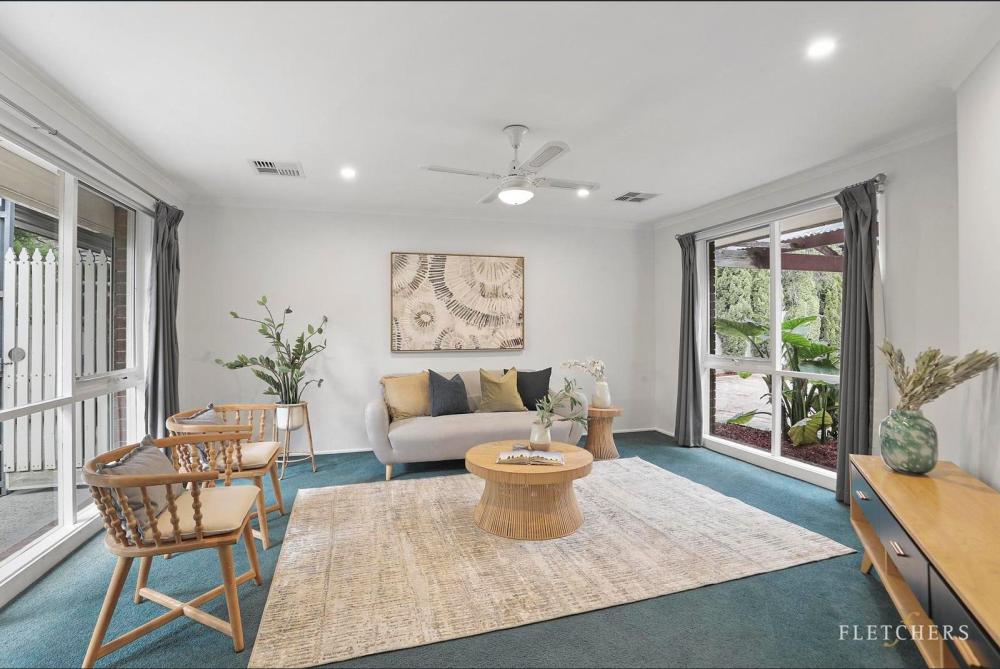
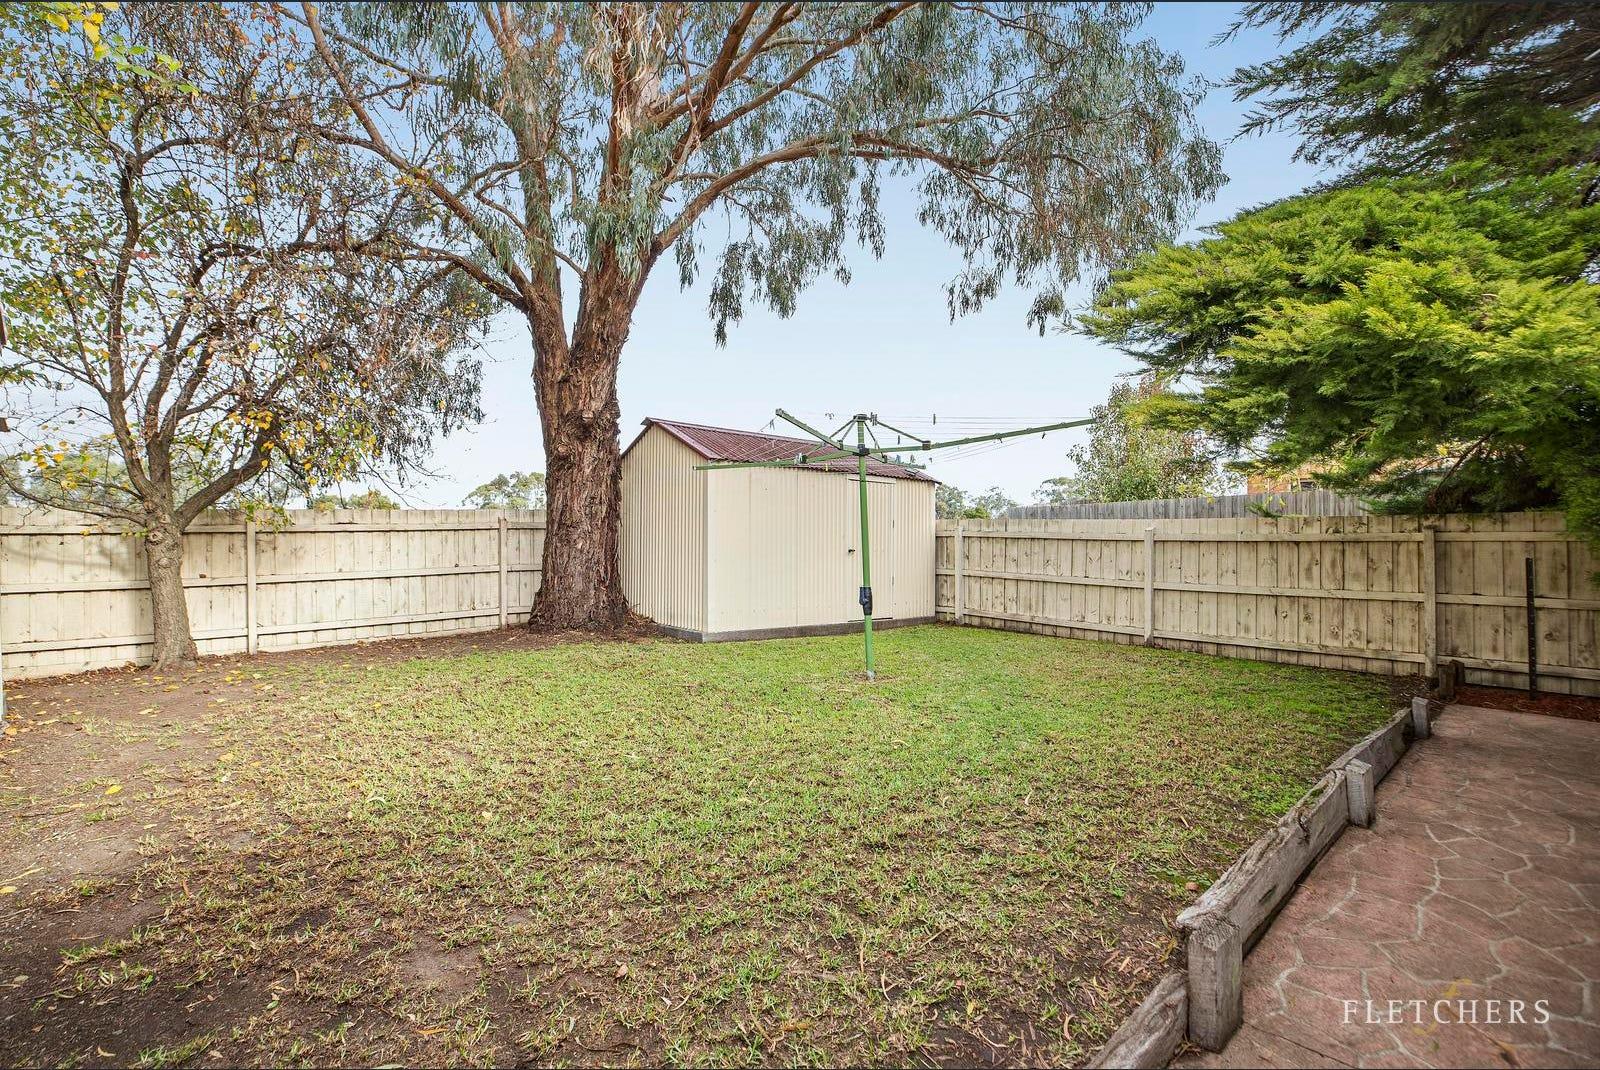
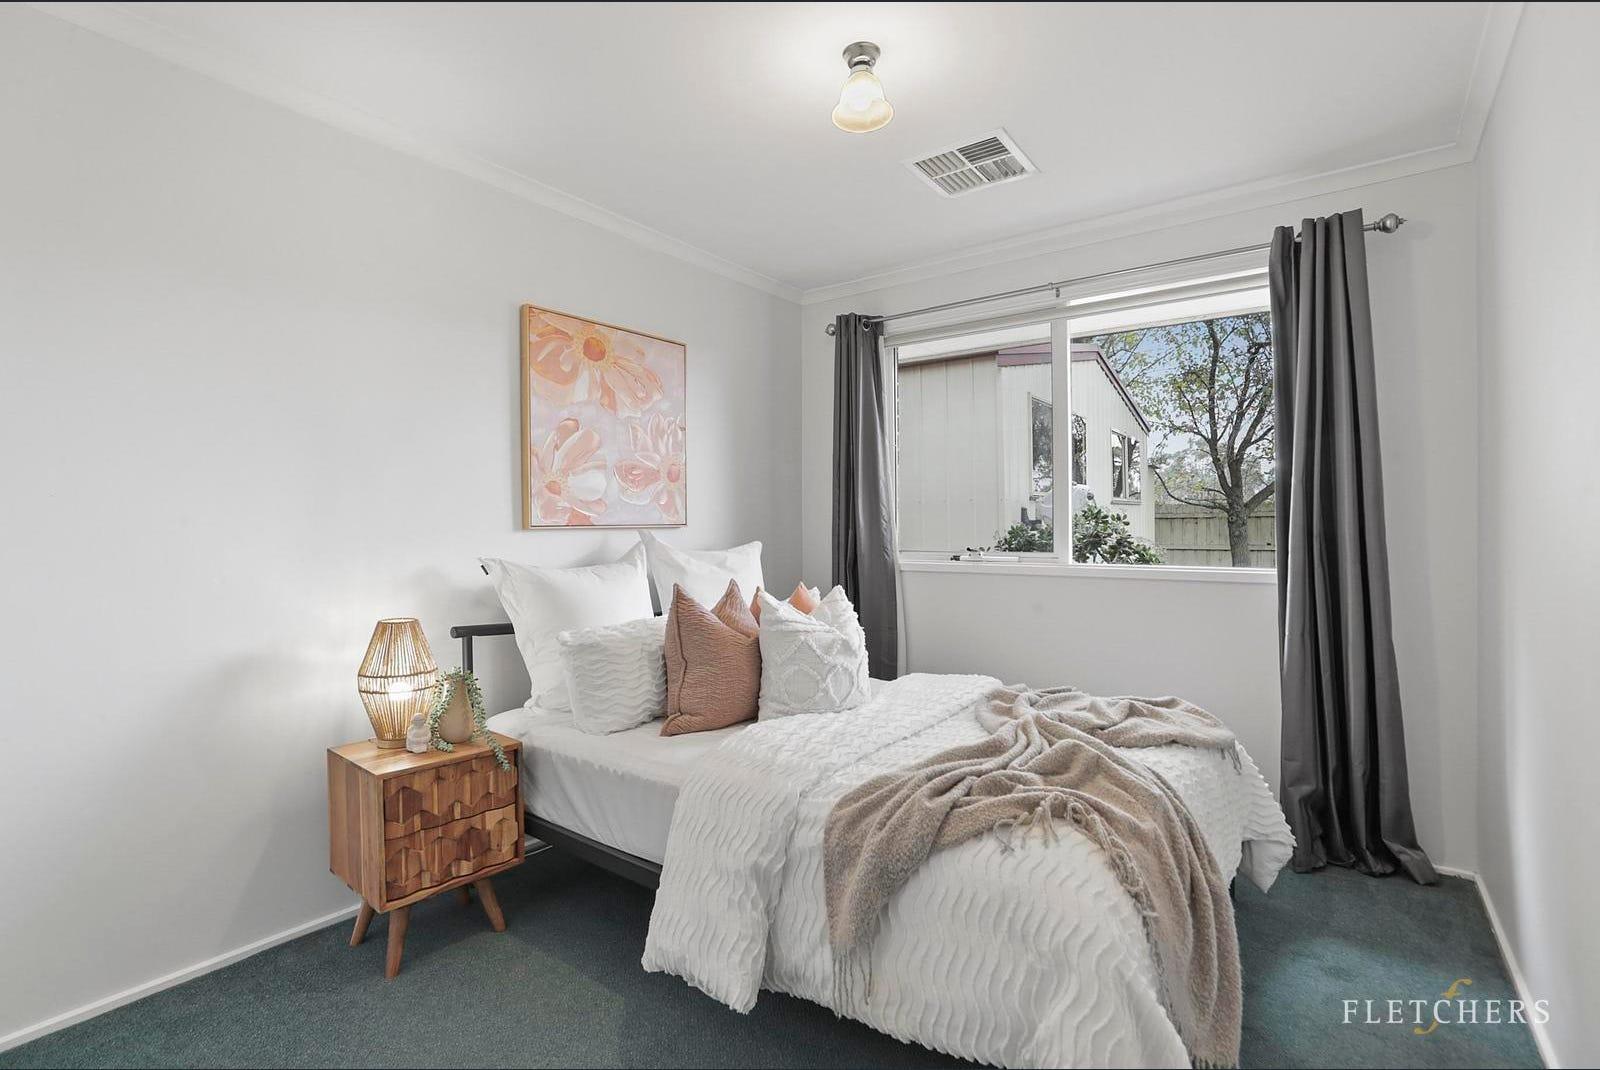
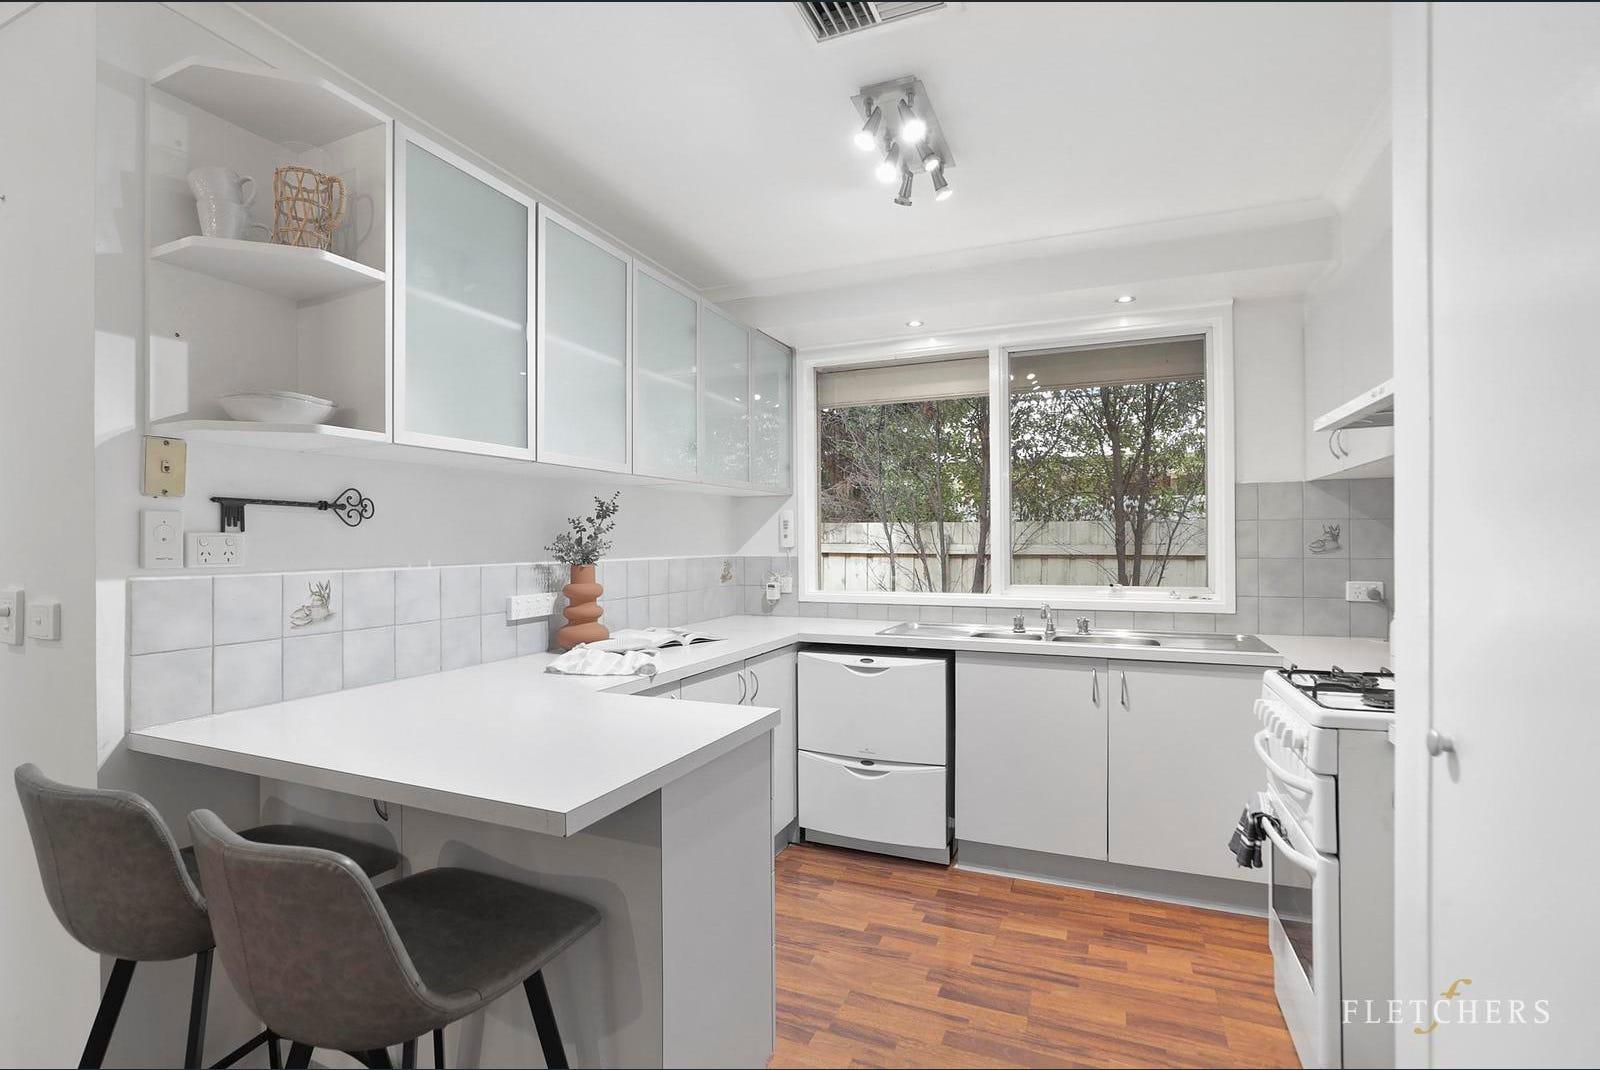
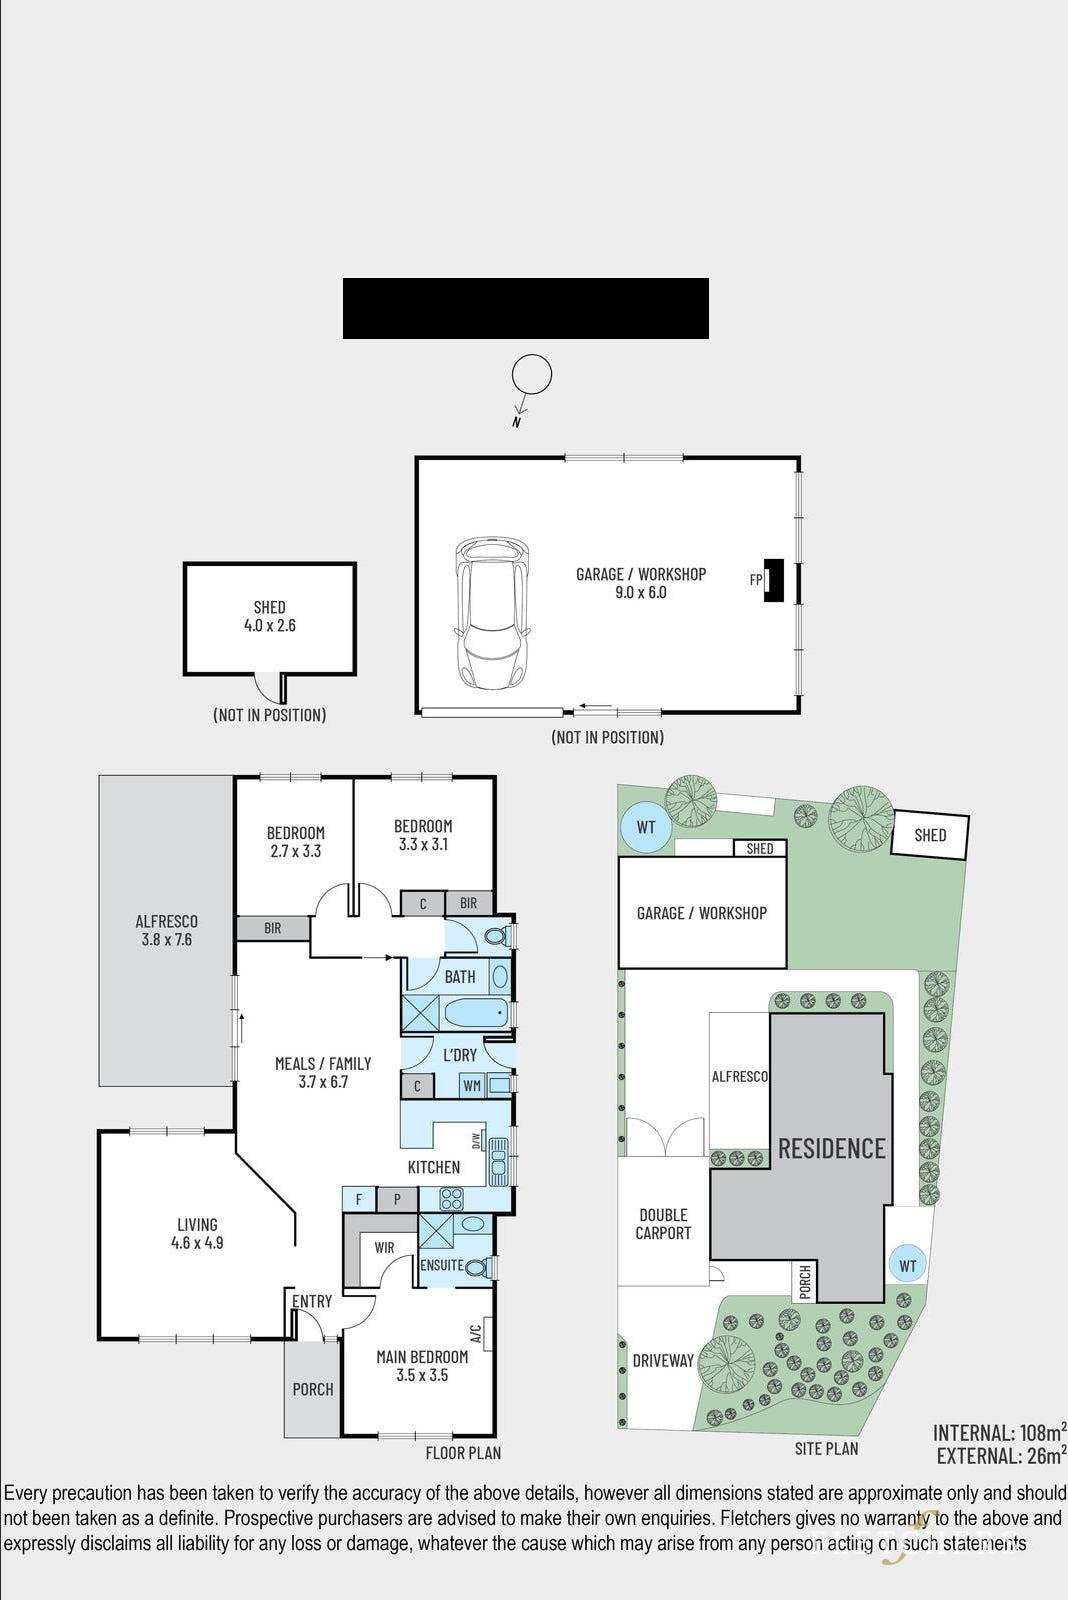
Bought a house settlement date was 27th June... $$ but absolutely worth at as I'm loving being able to change whatever I want in this house and have more pets than just 1, amongst heaps of other benefits... only real downside is the sizeable debt/mortgage, but without kids I should be able to pay it off reasonably quickly. The photos from the real-estate listing... none of the furniture remained except the tv in the alfresco area, the security camera system and the "key" thingo on the wall in the kitchen... haha Outside the house... The front (a photo I took actually to see the real estate sign out the front): Trees are much bigger than this now in the backyard haha A nice entertaining area. As can be seen by these two photos, the whole area was filthy well before we bought the place. (as per the discussion over here -> https://www.fordxr6turbo.com/forum/topic/81090-cool-stuff-you-just-bought/?do=findComment&comment=1723568) And the sizeable garage definitely one of the main reasons I was happy to purchase it... it has a nice high roof too that might even fit a hoist 😜: Inside the house... The secondary bathroom: The bedroom in the back-left corner: The master bedroom (there's an ensuite and walk-in-robe to the left here, not pictured): The dining area and on the side the doorway to the back-right bedroom is visible: The dining area looking toward the front door. The kitchen storage space for days. The missus is happy with that The lounge room: The floorplan: To say I'm happy with the purchase is a massive understatement. I'll probably update this thread with other stuff I've done over the ~3 months I've lived here In creating this post, I noticed I've hardly taken any photos showing how we've set everything up 😮 No big deal, plenty of time for that sort of thing later.


 5 points
 -
Thanks, if it wasn't this car it would be another and if it was 200 years ago I would be feeding steroids to my horse and putting wider wheels on my wagon.4 points
-
There's most of a bottom end. Still gotta clean up the sump surface and torque the mains but the hard part is done.4 points
-
I managed to trim the video, here it is. It doesn't look like much but the cuts were pretty violent. The last part I lifted and floored it again but the first part was wot. https://I.imgur.com/nRuSCZ0.mp44 points
-
Washed it... And washed @Puffwagon's car. It was a team effort to wash both, of course... bloody hot day to be doing it, but the result was worth it, after the car was covered in all sorts of road-trip-grime and Puff's a bit covered in crap after he decided to show Kelli and I the sights around his town, down a dirt road! haha. Good to spend some time up here in Adelaide Cheers for the hospitality to myself, Kelli and our two dogs , Puffster & Family... Puff also lended some mechanical help haha... had neglected my car a bit in lieu of the house purchase/after-purchase-work and found a few issues Dump pipe was only held on by one nut! and there was 2 studs missing of the 5, the 4th one pictured is one spare that Puff had haha Puff found some bolts with the same thread, which were too long, so out comes the angle grinder and the bench grinder to cut them to the right length and then to clean up the cuts haha... now the dump pipe is nicely tight and hopefully won't come loose again so easily... oops... Funnily enough, most of my exhaust manifold and turbo-to-manifold bolts/nuts were loose, too... torque'd 'em all up, as well. Fiddly bastard to get a spanner on some of those, as anybody who's had a go at those can attest And to top it all off, found a loose bolt for the exhaust housing of the turbo; luckily it was the one where the oil drain is otherwise this probably would have backed itself out all of the way and be on the road somewhere... All this "loose" stuff, was probably caused by this damage to the impeller blades Amazing that the turbo is still holding together and making reasonable boost amongst all of those vibrations it'd probably be causing with that sort of damage... still no shaft play and the blades aren't touching the side of the housing, either, so... got some time before the turbo will need some work haha Also had only the front-passenger-side down to metal-on-metal; another oops... not so bad on the front-driver-side, interestingly... new pads and discs today are on the agenda.


 3 points
 -
LOL I did the same - now it's dirty frying pans and a smoke filled house every morning. I just want 5 mins to make some oats and a coffee, but the kitchen is like Macca's on pay day.3 points
-
Any farken way, I did car work on the territory and it's sorted now. Running 45psi on E42, boost cut at 50psi, 17 degrees of timing, no knock, 95% injdc, iat's climbing quicker than a monkey up a light pole. Makes the plaz front mount look like a stock top mount. It pulls pretty flamin hard, obviously making somewhere over 750kw. Farken other car can wait until I can be stuffed fixing it. The end.3 points
-
Here's a pic of the stuffed head gasket, farken farkers farked! This gasket was a cheap one, suitable for maybe 15 to 20psi tops. Even a high quality MLS will only hold 30psi or so, only decent options for the barra are Athena split ring gasket or copper fire ring gasket. Might be worth looking to 14mm head studs in future as well.3 points
-
Hey Keifff long time no post… thought I’d give an update… Ate lots of food… lifted heavy stuff… Spent 17 weeks in prep eating f*k all and still lifting heavy stuff… got decently lean… now going back to eating lots and lifting heavy stuff again… the end 🤣3 points
-
Here's a bunch of PDFs related to the zf series of transmissions, mostly 6 speed variants. They range from simple connector seal installs right down to complete rebuild procedures, including the adaptation procedure after a trans reset. ZF.Trans.Mechtronics.pdf ZF_Adaptation procedure.pdf ZF6-GEN2-ZIP.pdf ZF_Workbook-transmission-6-8HP.pdf3 points
-
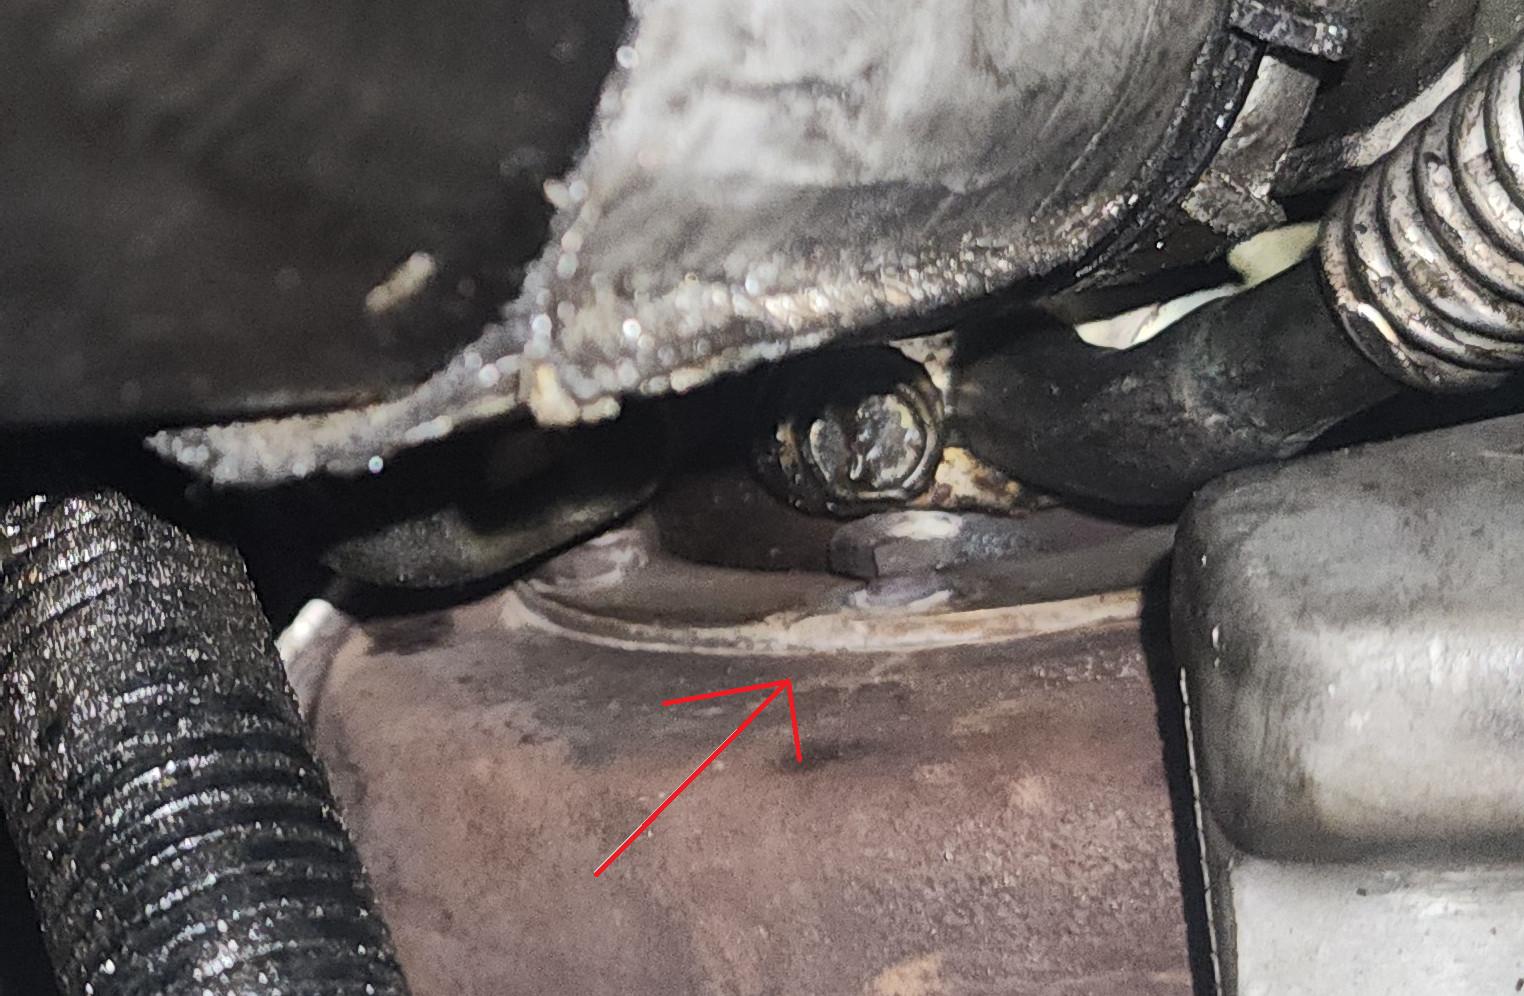
Alright, so tonight I got the gearbox out. Was a pretty good feeling as I've never removed a transmission out of a car before. I had some questions though. Took some pictures but just need confirmation on some things. Upon inspecting my rear transmission mount I think it is gone? Initially I thought it slots in but the rubber has torn off from what I can see. Is my thinking correct? I'm using this as my comparison as well (https://www.repco.com.au/parts-service/car-engine-parts/engine-mounts/kelpro-engine-mount-mt7020/p/A9393840?rgfeed=true&cid=google-shopping&utm_source=google&utm_medium=cpc®ion_id=100009&gad_source=1&gclid=Cj0KCQjwo8S3BhDeARIsAFRmkOO2hd1jqrjLXqr8lphoJ2k-d5stwjJoImH1Xcq77u4AaFAizBBcS8kaAn_7EALw_wcB) My Mount NEXT QUESTION. How do I get this clip off? Do I need a special tool or can I do this using normal tools. SEE PICTURE FINALLY IT'S OUT! Thanks Everyone.3 points
-
No I haven't bought a battery yet, I forgot. I will get one this week though, so it will be sorted when it gets rebuilt. The rings, bearing and rod bolts arrived today, if I wasn't slack I would have the pistons ready but I've been sore from lifting weights and sitting on the toilet is a struggle lol. I'll get the pistons done tomorrow, then get a start on yanking the engine out. For anyone who is interested, the current piston to bore clearance is 5.5 thou, which is fine if you wanna go apesh*t with the boost. Being that I'm gonna coat them and not go apesh*t, any extra clearance will be taken up by the coating. I'm gonna run this in a bit more gentle than usual to let the coating survive the run in process. Usually I would give the rings 20 minutes to half an hour to seal up, which is all it takes, then go full send. The rings will still get the half an hour of run in, but I'll give it a week or two before cranking it up. Anyhow there is that, here's a pic of a clean piston vs a dirty one, they're all clean now so just gotta give them a wash and dry, then get to coating. They have been blasted with glass bead to give them a profile for the coating to stick to.3 points
-
My wastegate line split today and made 32psi in the mid. Lucky I know a thing or two about tuning and there was ample protection there to save it. I reckon some dash 4 fittings are in order for the wastegate and Mac valve, this should prevent any further issue like this arising. On a side note, I think I'm going to add more water meth jets to the intake, cos the warmer weather is showing enough of a tune change to warrant further cooling. Also did a trans service today, the trans fan stopped working yesterday while I was towing the boat and the car went into limp mode for a hot trans. I sorted out the fan wiring, gave it a fresh batch of hectic trans oil and a fresh filter, iirc the filter comes from a ranger. Should give the old girl a wash, it's probably been 2 years since it had one3 points
-
Awesome bit of info on here thanks garyk, had exactly the same thing happen to my 2009 FG XR6, tried a spare G6ET cluster in it and it stopped. I know this was an old post but I think it is good to give feedback on fixes like this that can save a heck of a lot of mucking around chasing the wrong symptoms and this is what these sites are so useful for. Thanks again Garyk2 points
-
Ordered it. Never in a million years thought I'd head down this path, but ordered a BYD Seal Performance. EV tax deals, 390kw and 0-100 in 3.8 was too hard to ignore. Need to hang out here with you guys more. Someone on the Seal FB group asked how people on novated leases are finding their cars so far. Exactly the friggin same as anyone else I would have thought. Posted what I thought was a hilarious reply about pre-tax kw but no one seemed to get it. Sent from my Pixel 9 using Tapatalk2 points
-
I installed the VN Group A transmission. New Group A brakes, rotors and braided lines.2 points
-
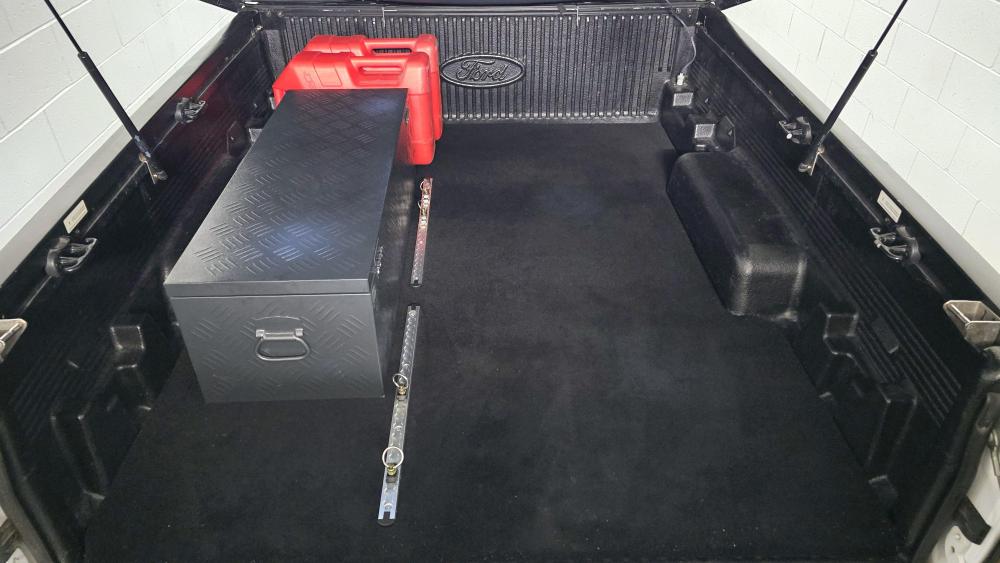
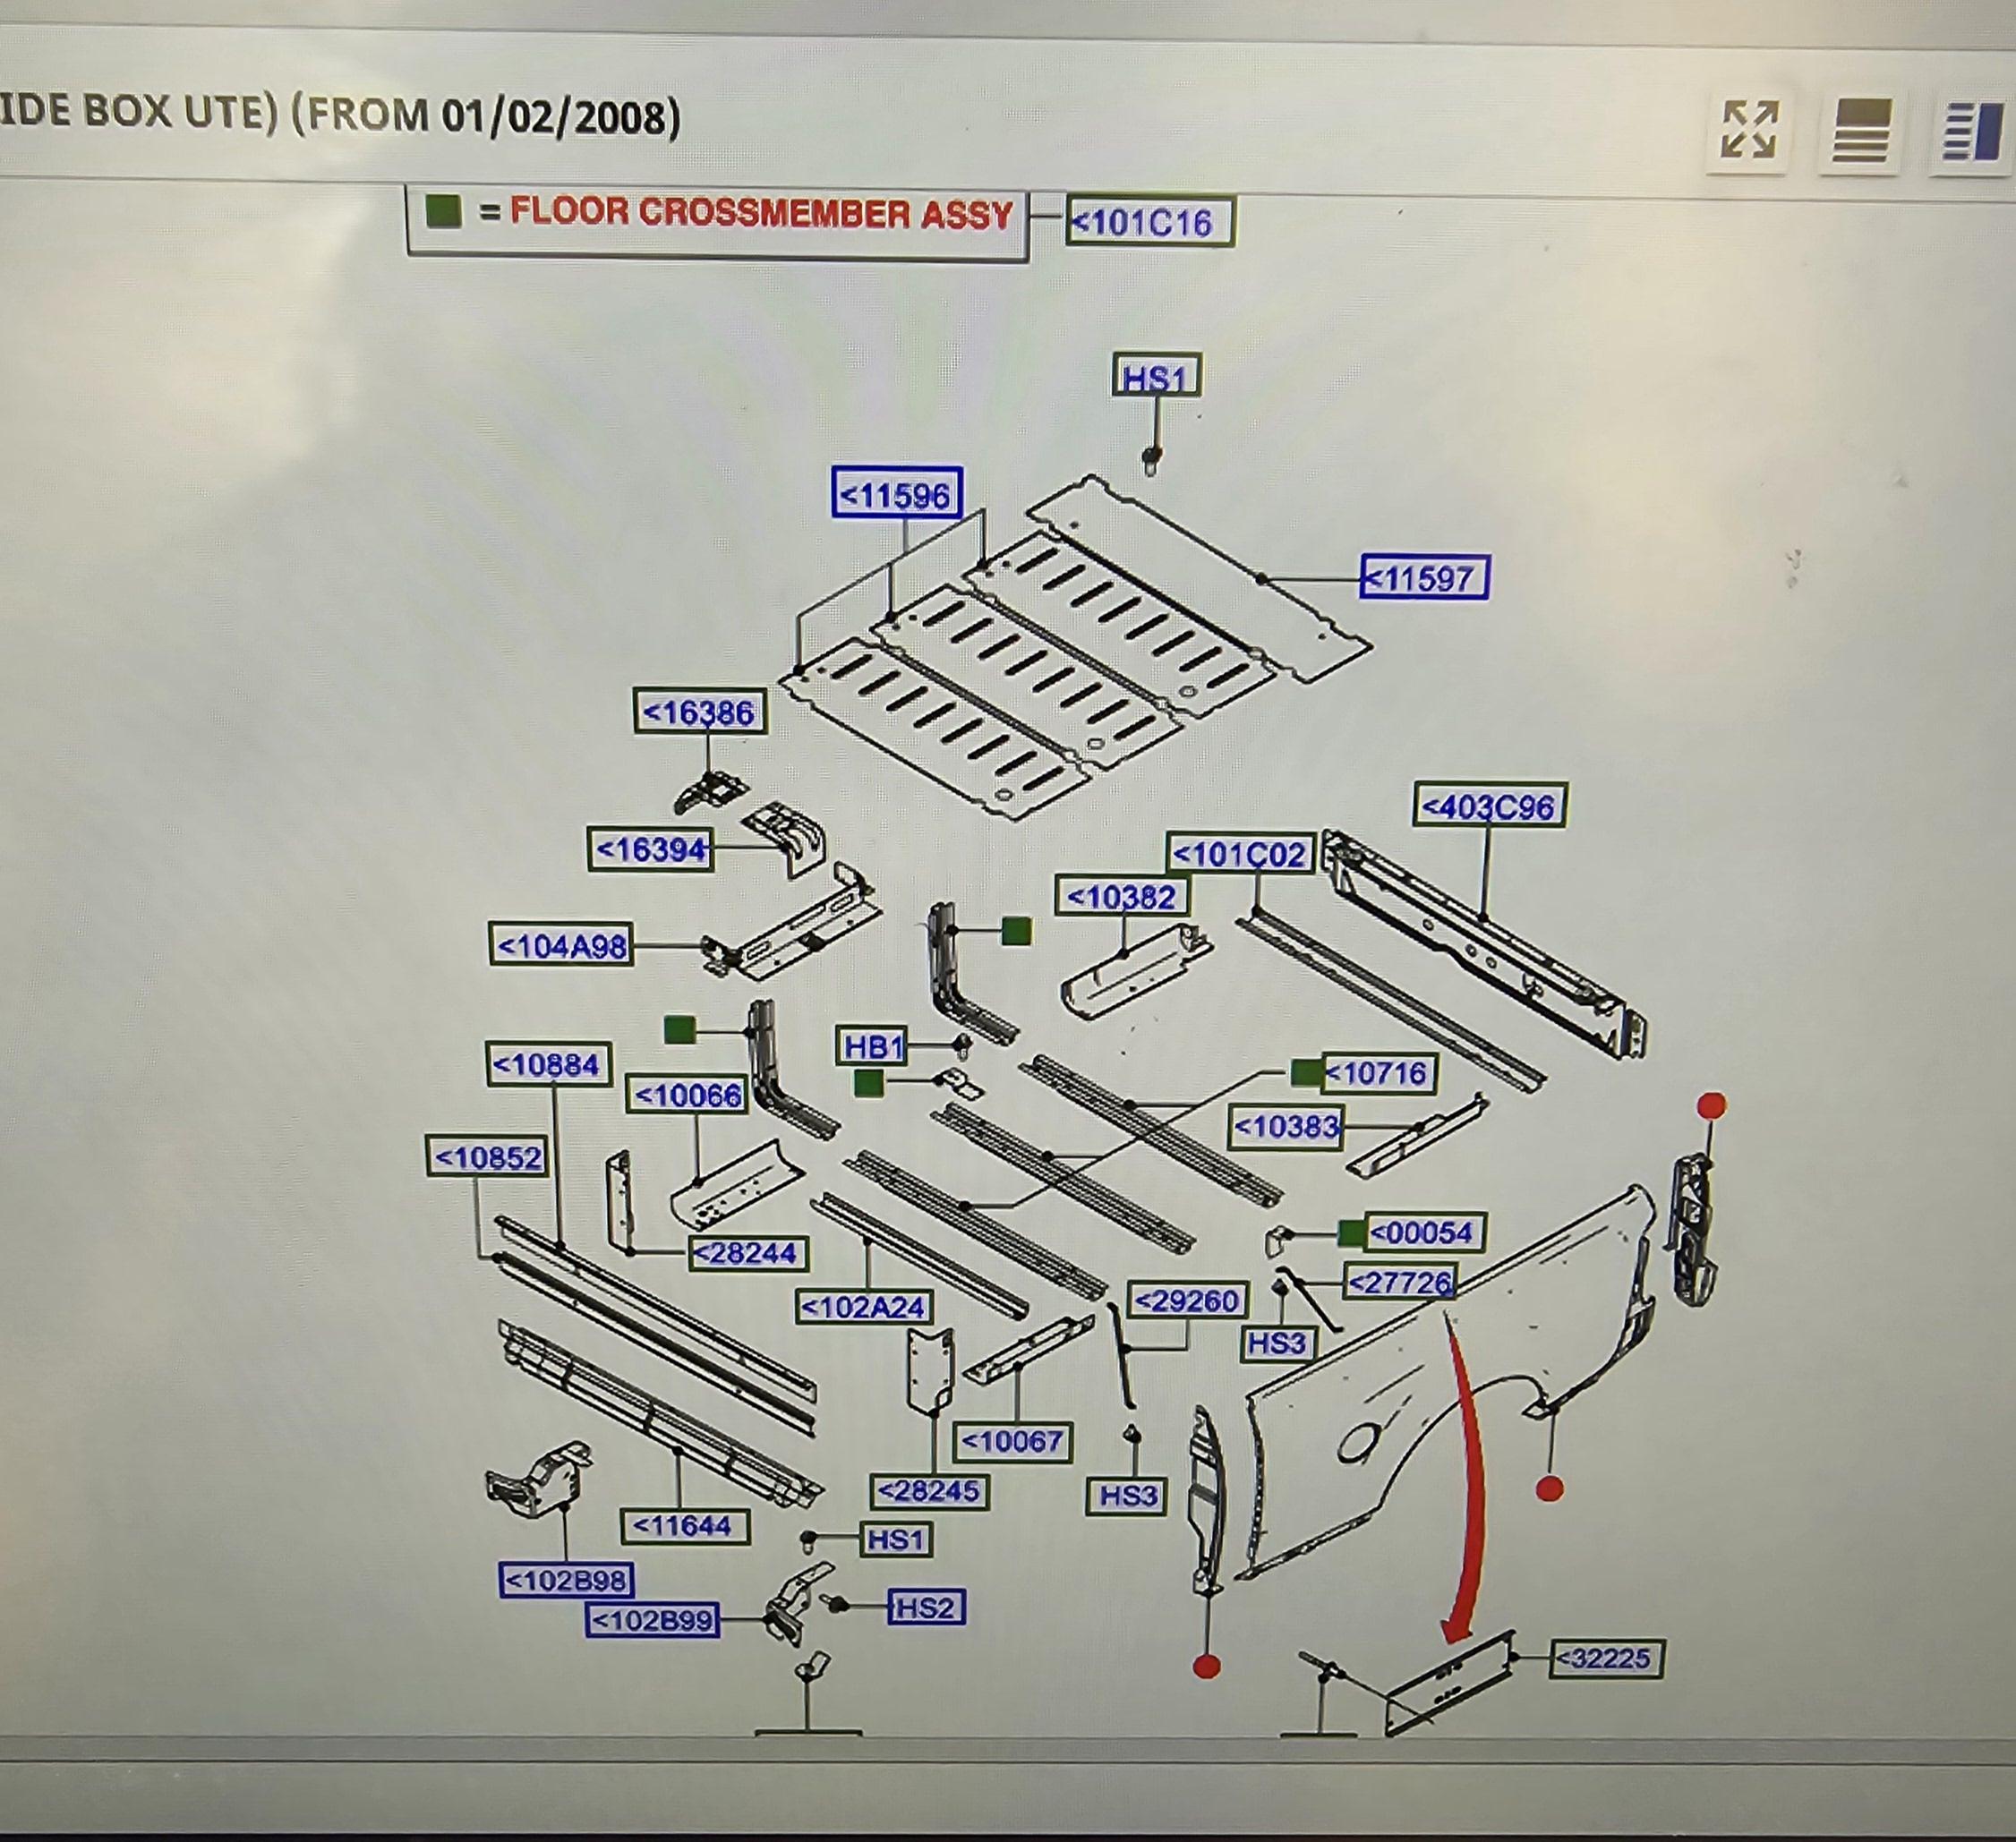
Hey guys, I had been wanting to do this to my FG trey for years now and finally did it. However, I got a pro to do it. PFA blueprints of the Fg trey. The next photo is the work done to my tub. Thick marine ply was set down and bolted to the cross members, the anchor rails, and tool box screwed into the wood, and then marine carpet. Ps. I know I'm replying to an old post, but this is more for the people who are looking to do something like what has been discussed. Cheers

 2 points
 -
from this https://imgur.com/a/mx4EDyC to this https://imgur.com/a/G5yMgtF2 points
-
It should get to 700kw fairly easily, it depends how hard you want to lean on the fuel system and the engine. If you're ever in SA send me a message and we'll organise something.2 points
-
Made a slightly inebriated decision yesterday to buy another na engine for the territory. Can just do valve springs and run 15psi for a while. At least it'll keep it mobile and possibly motivate me to build it again.2 points
-
As another year comes to a close, it’s time to reflect on everything we’ve built together and celebrate the incredible community we’ve created at www.fordxr6turbo.com. Christmas is the perfect time to pause and appreciate the friendships, knowledge, and shared passion that make our forum so unique. It’s a season for family, creating unforgettable memories, and celebrating the little joys – like spotting an XR6 Turbo, Typhoon, or F6 310 roaring down the road and knowing you’re part of something special. This community isn’t just about cars; it’s about the people who bring it to life. Whether you’re a seasoned expert sharing your insights, a new member asking questions, or someone who visits just to soak in the excitement, you’re the reason this place thrives. Together, we’ve turned this forum into more than just a website – it’s a home for enthusiasts. Running this community takes dedication and resources. From server costs and hosting fees to software updates and keeping the forum running smoothly, it all adds up. But we do it because we believe in what we’ve built – and in all of you. As we look ahead to 2025, there’s plenty to be excited about: upgrades to enhance your experience, continued improvements, and new ways to grow and connect as a community. But it wouldn’t be possible without your support. If you’d like to help keep the lights on, the forum active, and the passion alive, we welcome any contributions. Every donation goes straight into ensuring this platform continues to be the best place for XR6 Turbo enthusiasts to gather, share, and celebrate. You can donate here: 👉 Donate Now Thank you for being part of this journey, for keeping the spirit of the XR6 Turbo alive, and for making this community a place we’re all proud to call our own. From all of us here at the XR6 Turbo team, we wish you and your families a joyful, safe, and turbocharged Christmas. May the New Year bring smooth roads, exciting mods, and plenty of time to enjoy the ride! Much love and Merry Christmas, The Ford XR6 Turbo Team 🏁 Stay safe, stay turbocharged, and see you on the forums in 2025! 🏁2 points
-
I looked at the dyno today and thought about setting it up. It was 35c here today and the rain was intermittent, so I gave it a miss. The joy of an outdoor dyno. I'll get back on it tomorrow I reckon, keep things fresh and further develop the mafless tune for the Caprice. I have been watching countless hours of LS based HP tuners content, feels like I'm back in school lol. My OTR was lost in the post and after several calls and a couple emails, it's back on track to be delivered next week. That's about all I've got for dyno content, if you want a power run, hit me up, can get you in whenever.2 points
-
Good stuff on getting it sorted out AND coming back to let us know how it was done @sterps2 points
-
Bought a new set of wheels2 points
-
I have the same jack. I found that if you drill a big hole in it, you can fit a steel pan to the jack and it will support the trans perfectly. This worked for my zf territory/transfer assembly, should also work for a rwd zf too.2 points
-
Here's a pic2 points
-
So the transmission is all back in. This time, it went in very smooth once I got the transmission bolted on. The difficult part is getting it onto the jack. I saw a video of just using wooden blocks. Somehow on my first go, I actually did this, using many small wooden blocks stacked near each other to raise the trans. However it's a poor way of doing it. Had to figure out a better solution. I realised that I had little to no spread of force and tension across the bottom of the transmission with small blocks and my jack. So I made a wooden bracket at the back and front of the transmission using some M10 bolts from wood I had lying around the garage. It worked really well. One thing to note is you need to make the bracket at the back long enough that when you stick the transmission jack under, the supports aren't blocking the path of the jack to go under the trans pan. The photos may explain this a bit better. https://imgur.com/dGBzcyY To get the height I needed, I used some big pieces of thick wood. Originally they were going to be used as car raising blocks but they've come handy for many things. You can see the support at output shaft end. Just used two existing holes to bolt it up. Used the lower mounting holes on the bellhousing for the front piece as well. You get the idea. My original piece was too narrow and I made it longer by 15cm on each side. Front of car looking back https://imgur.com/undefined THEN JUST A MATTER OF GETTING IT HIGH ENOUGH AND THEN PUTTING A WOODEN BLOCK UNDER THE PAN TO JACK IT UP. ONCE THE TRANS IS SUPPORTED BY THE JACK, MOVE THE BLOCKS AWAY. You may need to have one hand around the trans to balance it a little occassionally but it should be good if you have at least most of the support covering the back 2/3 of the transmission. This time I used some threaded rod as a guide for the two M10 holes on each side of the bell housing to help line the transmission out. Once I had all the bolts in, I puts the transmission in and it slotted straight away. TIP WITH THE TORQUE CONVERTER: As posted in this thread before by Puff, make sure the nose of the torque converter sits inside the bellhousing. I pushed the converter on and it clicked on what I thought was 3 times but it was twice as the nose was still outside. If this happens, continue spinning the transmission clockwise whilst putting some pressure as you push (doesn't have to be excessive). Eventually after 6 or 7 rotations it will just slot in again and move further back and be seated. You'll definitely know when this happens and the nose of the converter will be inside the bell housing2 points
-
Turbo territory in today for engine mounts. Got em done, I'm happy and customer very happy. When you actually know what you're doing and aren't just marketing to people, it's a win win.2 points
-
I love it. There's probably some old overclocking boards out there, I might be able to run the chip at 3.4GHz or something lol. What I think I'll do sooner or later is upgrade the dyno pc with my current setup (4790k etc) and just get a new mobo, cpu and ram for my desktop. In other news the shed has been updated, the plan has been drawn up, the deposit has been paid and the council application will go in tomorrow. While I could afford the larger one and it would have fit, it was much too big to be reasonable lol...it would have been epic but not reasonable Here's a pic of the new version2 points
-
So rather than upgrade the dyno pc with something decent I'm merely upgrading the cpu from a core 2 E3400 to a core 2 Q9500. I'll even give it a a fresh 4gb of ddr2 800 to liven things up a bit. Haha very old tech but still a decent upgrade2 points
-
Yep the guy had all but given up on his chances of having the car ready for racing. He already missed practice today but will be there for qualifying tomorrow morning. I'm getting a whole ass workshop installed and it's about time. Shed will be 8x18m, 4 post hoist that I currently own will be installed and I'll get a 2 post installed too. Move the dyno in there, move the tools in, move the tyre fitting stuff in, etc etc. I'm also gonna get a late model LS3 Caprice for a shop car so I can tune them too. Plenty of work involved with it all, just gonna send it and see how I go.2 points
-
John @ JZ Custom Alloy made the tanks.. Unfortunately, he will not make a tank unless he has a car. I had been chasing another guy for 8 months, for a tank. I rang John and luckily for me, he was making a VN tank for his mate. Being a true gentleman, he offered to help me out . I ended up getting two made, one for another project. I just unwrapped the tank, First impressions. Awesome!!2 points
-
Sorry to hear. So much work has gone into your build, but it's great you're sharing your experience, both good and bad. I'm amazed the driveline seems to take all the punishment2 points
-
They are an unavoidable part of life after 40. Each day I don't sh*t myself I count as a win2 points
-
I have a 5L VN so I chucked that on the dyno today, it made 153rwkw with the air filter on and 161rwkw with it off.2 points
-
Things are definitely on the up and I'll probably be posting in the drunk tank later on tonight 🤣 Settlement just went through for our home of 26 years. It's been a rollercoaster ride over the last 4 months since we employed our realestate agent It took 3 months to sell but we got more than expected. It's only the second house we have ever sold so we are novices as far as realestate is concerned. So now its farm life, a bit of a slowing of pace. There's plenty of work to be done, but that was the whole idea, early retirement but remaining physically active. https://www.realestate.com.au/sold/property-house-qld-clifton+beach-1451981922 points
-
Cheap head gasket says no. It leaked a bit on the dyno, leaked a whole lot more yesterday and blew up the radiator today. Athena gasket is getting express couriered and will swap it out before the weekend. Ha just when I thought I didn't have to swing a spanner for a while.2 points
-
Too late for that, it's attached to the crank and has a trans covering it up now. If you go back through this thread and see a pic of my flex plate, you'll see that there's a bit that was damaged from the factory. I just went around the whole thing and evened it up. I am pretty decent when it comes to being neat with a grinder, it will actually be miles better than it was before.2 points
-
Still battling the gastro but got some more done today. Head cleaned up, a couple of leaking valves lapped in, washed, rinsed, dried and ready to go back on. Block surface prepped but not a lot to do there. Wankers sent me a bent gasket but it should straighten out after a heat cycle and re-torque. Fitted the head and snugged it down to 120lbft. Hmmm, lifters and Kelford 218-C cams fitted, Atomic vernier gears fitted, timing chain done and timed up and it was about then that I had enough and am now sitting with a bundy and coke.2 points
-
Rings gapped and on pistons2 points
-
Engine out and measured the bores. Bear in mind this block is std with 380xxxkm on it... It has between 0.5 and 1 thou out of round and taper in it. Taper is nearly non existent but obviously out of round is where it gets most of the wear. I could get it professionally honed to make it round and it would still make size. But I ain't gonna, it's well within service limits so I'm just gonna send it.2 points
-
Baking a goddamn cake up in this bish2 points
-
can't wait to get in the gym this arvo2 points
-
I'm doing full body 4 days per week, I probably should have done 3 but eh, I'm doing 4 lol Base stuff on recovery ability, smaller muscles recover quicker so chuck in an extra day or two of arms and shoulders for example.2 points
-
Ok well it wasn't the cam timing that was causing the cutting out issue. Yes there was indicators with the cam timing around the cutting issue and while they may be related, it wasn't the cause. Lol I reckon it might be the battery is farked. I knew it was a bit sh*t but I didn't replace it cos it charged up properly. Anyhow I'll get a new one and we'll see how it gets on.2 points
-
Ok I dunno why but I decided to fix sh*t once and for all and in the most hectic manner possible. In short I put my Kelford 218-C cams in, I locked them up with my Atomic vernier gears and I dialled the cams in with a couple of solid lifters and a dial gauge. I've spent an hour or so dialling it in and I gotta say it's pretty good. I haven't even got the spool assist on and it doesn't feel slow at all! Lol the car has a hella choppy idle but you get that2 points
-
Ok, head gasket ordered, rings for pistons ordered and new 7/16 rod bolts ordered. I figured I'd better do the rod bolts cos they have been used 3 or 4 times now and are probably stretched too much. My Haltech cable arrived this morning so I can get to tuning the car slightly and when all the stuff arrives I'll sort the engine out. I also bought a bead blasting cabinet yesterday with some glass bead to prepare the pistons, so everything is set in motion to get it done.2 points
-
Eh it'll make me pull my finger out and install the kit into the ports where it should be.2 points
-
I did it more so to use less fuel, picking up 10 or 20kw is neither here nor there for me.2 points


This leaderboard is set to Sydney/GMT+10:00