Search the Community
Showing results for tags 'plazmaman'.
Found 8 results
-
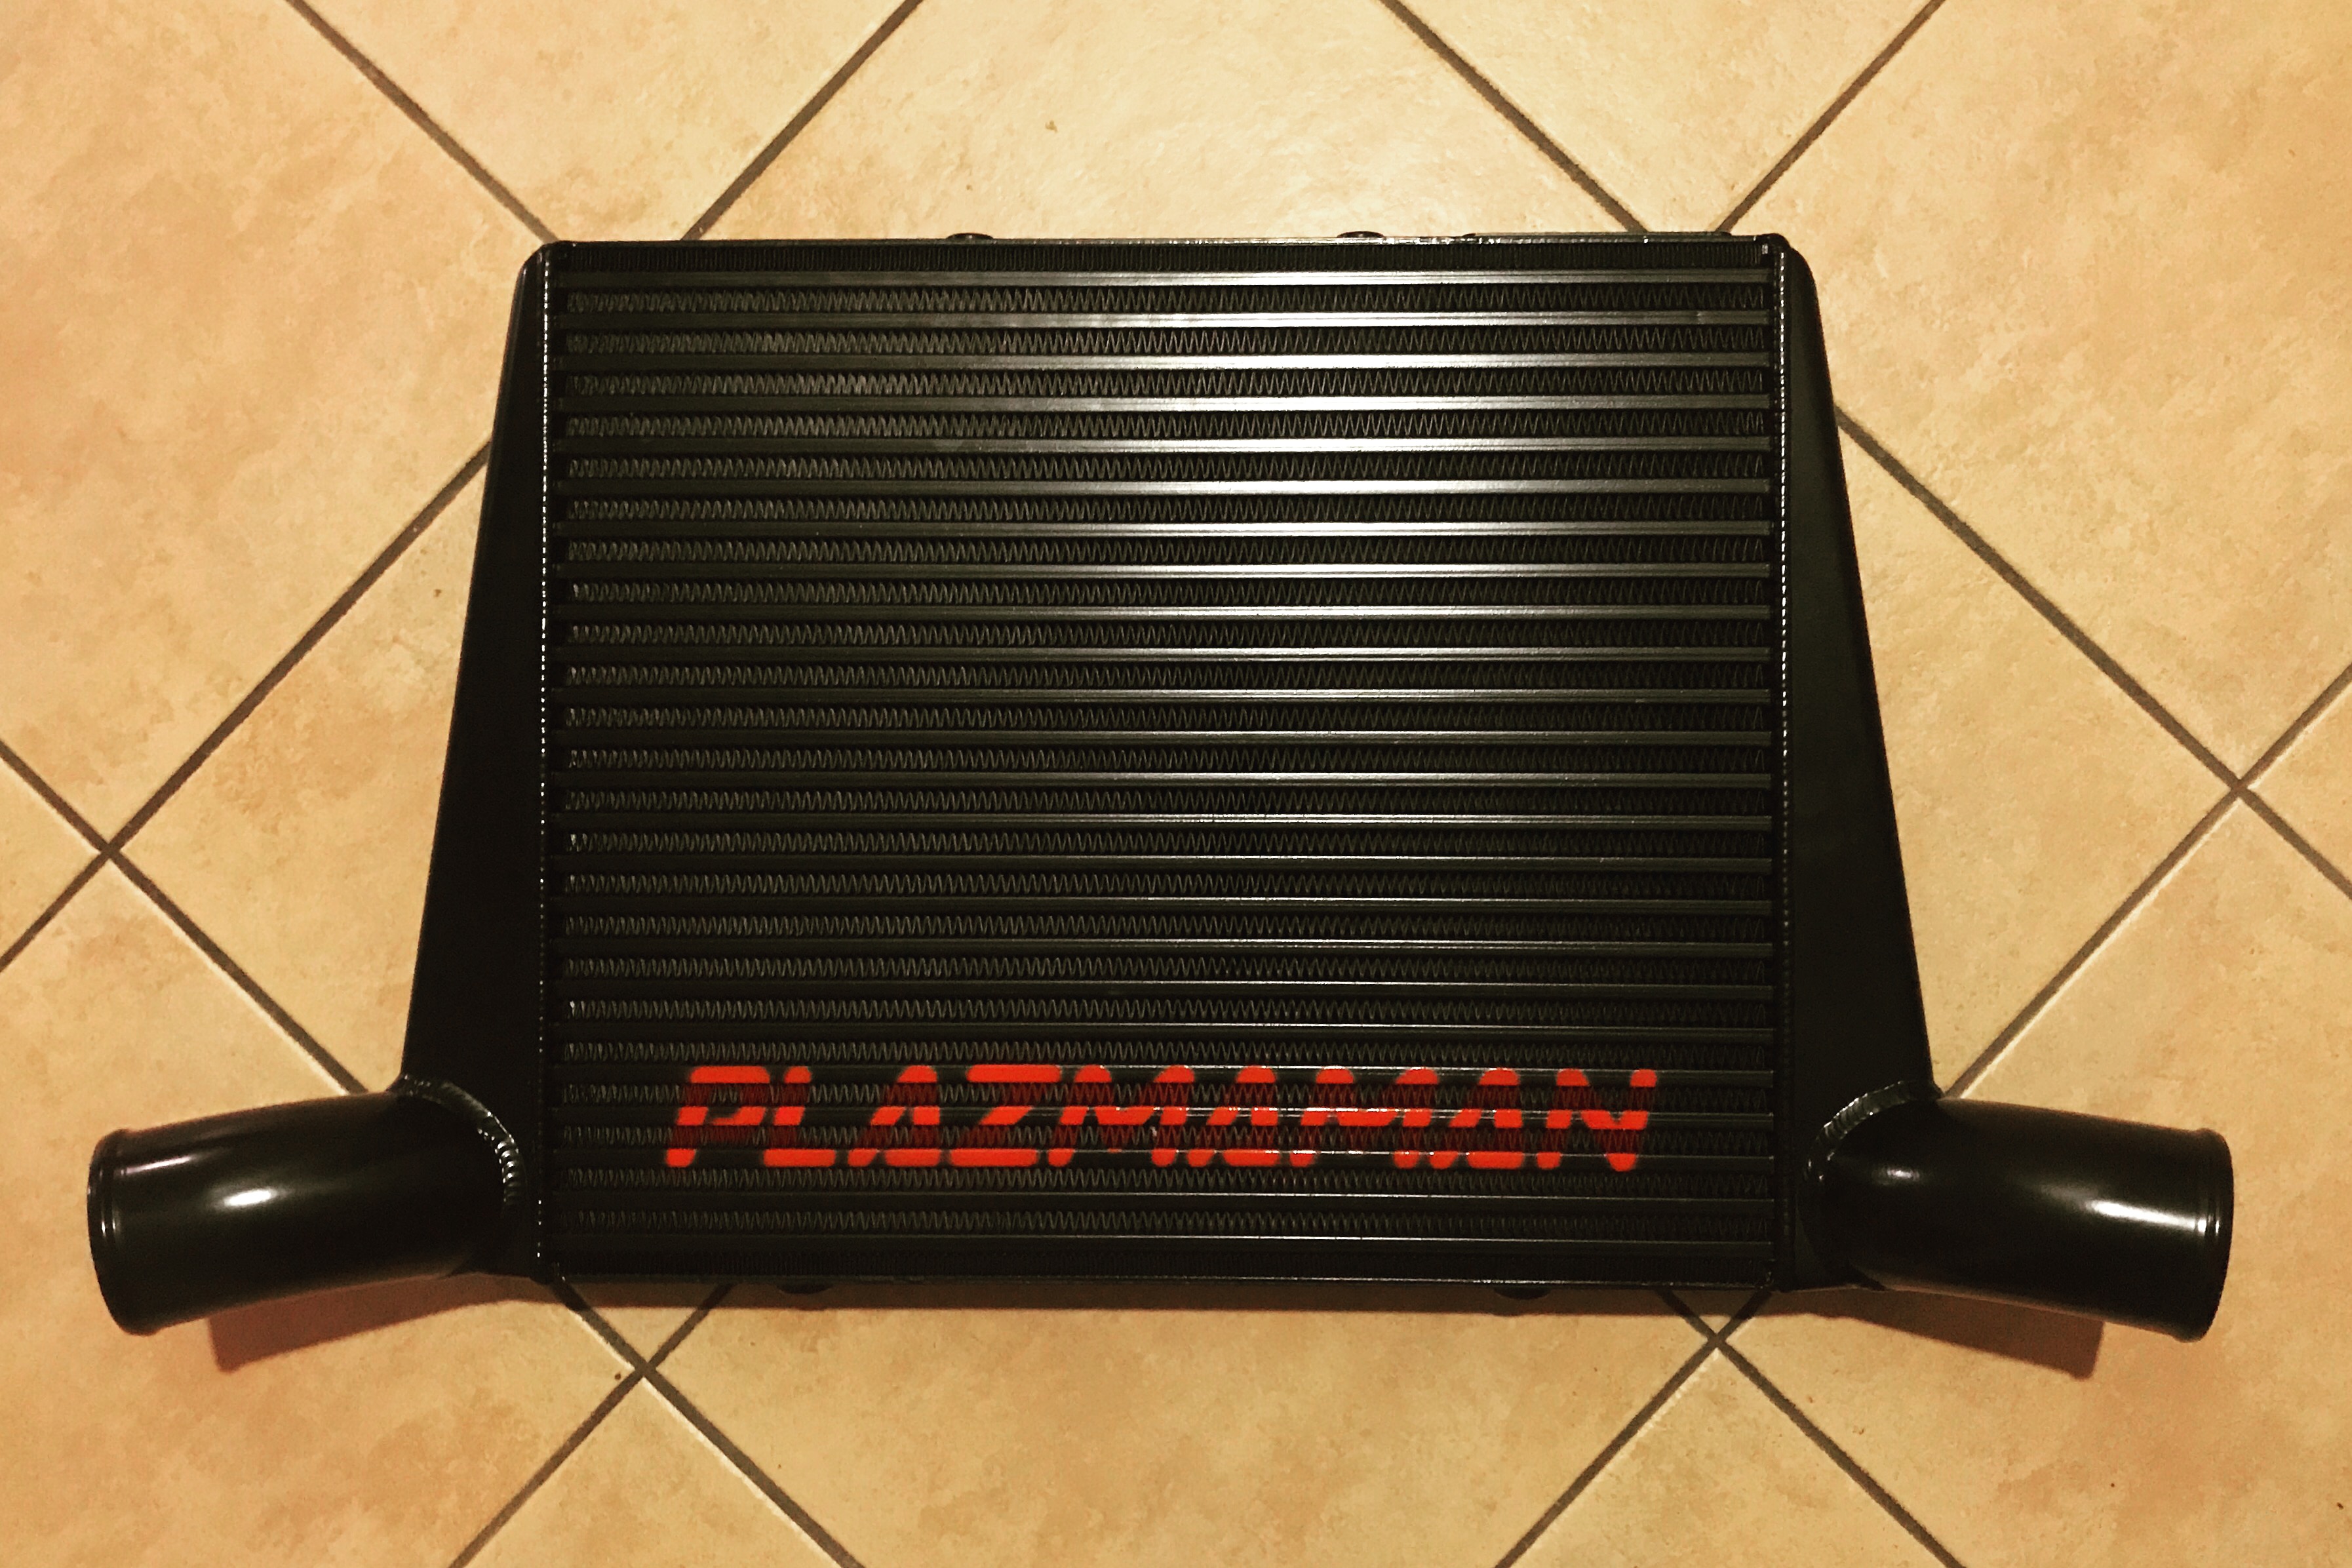
This has been a long time coming! I said I'd do a writeup of my intercooler install a while ago and never got around to it, till now! 💪 Take this thread post thing as a GUIDE! Every car although the same model can be slightly different, as found out after to a bunch of people who have installed this cooler – some even do it for a living! In saying that they will all be pretty close! Although this guide is done for a Mk1, a Mk2 install should be pretty similar, as far as I know the only real difference is that the Mk2 has AC lines that interfere and need to be bend out the way. I still recommend anyone that reads this guide to have a good read through the plazzy instructions too, they aren't the best but have some good pointers. Special thanks goes out to @JETURBO for all the wisdom and chats to help me through this! All the photos for this thread can be found here, some will be in the thread itself. IF YOU HAVE ANY QUESTIONS PLEASE DON'T HESITATE TO ASK BELOW! I WILL DO MY BEST TO HELP YOU AS BEST I CAN (And I'm sure the others here will do the same) Requirements The intercooler kit itself You NEED aftermarket piping, I went with the intune motorsports piping kit, pretty good for the price! You can go with the plazzy piping too. Silicone reducers, I needed a 2.5" to 3" (63mm to 76mm) reducer for the intune piping. Angle grinder for all the mad cutting you're about to do. Reciprocating saw makes removing the factory IC mount easier - I did it with an angle grinder but was a pain. Other usual tools: socket set, screwdriver, etc. PATIENCE! Start early cause this job will take a lot longer than you think!! Jack up the car, or use ramps, and take the front bumper off I used ramps because you don't need to take the wheels off to do this install. That being said, to take the bumper off without taking the wheels off is a bit of a pain. Not impossible though! Lots of resources online on how to do this hence why I skipped explaining it. Here's a good thread that covered it pretty well. Remove the bumper support, horn bracket, headlights, and wiper bottle Remove all the bits that will be getting in the way. The black support thing needs to be removed, so do the headlights. I took the horn off cause it got in the way, just one bolt and a plug for the horns themselves Remove the water bottle for the wipers. You'll need a deep socket for this! I did this later on during the install but just save the time and do it now instead of avoiding it like me. The horn and wiper bottle pics are shown below Unbolt Intercooler Remove the piping from the intercooler. My car already had the intune piping kit so I just had hose clamps. The stock piping is easy to remove though. Just follow the pipes and remove the bolts that hold the stock piping in place. There's 4 bolts in total that hold the IC in. Two on the sides and two on the top, shown below. Say goodbye to the POS plastic intercooler. Cut the IC Support off You don't need to cut this flush but I did cause it looked better. Refer to the Plazzy manual on where you need to cut it to get by. I recommend cutting it flush though. If you use a reciprocating saw I'd put some wood or something on the other side so you don't cut through anything important. I marked in black on the sides where I cut. I cleaned it up more after I took these shots too but you get the point I think. Remove lower rad support I followed the plazzy instructions for this, the bolt has a weird flat-head screwdriver type head on one side which I think is dumb but whatever. I held that with pliers. There's also a bolt on the bottom of the rad support too. I also zip tied the top of the rad before removing the supports just to help support it a little. Not necessary but gave me piece of mind so up to you if you want to do it. Once the bottom supports are off go ahead and remove the top ones too. Drill the holes for the new rad support Now this is the part where @JETURBO saved my bacon. These measurements are from him. The measurements from the plazzy instructions are a little confusing. Refer to the picture below to see where the reference is taken from for these measurements. The first mark is at 100mm and the second at 165mm. Its from the end of the lower part of the crash support bar thingy. Yes, thingy, just look at the damn image. Centre the holes across the horizontal plane. Start with a 4mm pilot hole followed by a 8.5mm hole. Install the new rad support Put the mushroom looking rubber pieces back onto the radiator but put them on upside down! Its weird I know, but just do it. Makes life easier! I found this part so tricky and a lot of cussing occurred over a sad amount of time getting this thing in. This is the way I did it but if you know an easier way then reply below! It may be easier if you remove the zip ties mentioned above before doing this. I used a jack and a piece of mdf to hold the bracket and lift it up I lined up the radiator holes with the rubber with the holes on the top of the rad support and slowly lifted the jack up. With some adjusting and wiggling, get the rad support to line up with the furhest back holes and bolt them in. Tilting the rad support towards you helps with this. Once the back screws are in you can then use the jack to lever and tilt the rad support to line up with the front holes. I wish I'd filmed this to show it better. But just be patient with this part. Take your time! This is one of the hardest parts of the install so have a beer to celebrate your achievement! Now compare the old with the new to bask in all the glory of the new intercooler you just purchased I mean look at the difference!!! This thing is hugee! Like Donald Trump huge! I do kinda regret not getting the polished version but oh well! Still performs great! Also, get another drink while you're at this stage because alcohol makes this way more interesting. Add the top IC brackets I only took a photo after the install but you get the point from this. The right angle brackets are fitted using the factory hood latch bolts. I used the upper slots but your mileage may vary. Start with the top ones and fit the cooler to see if you need to use the others. Keep the bolts loose so you can adjust the intercooler. Cut the condenser bolts and trim some of the inner front crash bar. Bend the AC line, cut the crash bar. This is step 13 and 14 in the plazzy instructions. You NEED to cut these bolts shorter to fit the cooler. On the other hand, the crash bar part is dependant on the install of the rad support. I needed to trim a little bit, and by a little I mean I did even use a cutting disk. I just grinded it down a bit. I recommend grinding some off just to be safe. You can always slowly fit the cooler and see where it interferes and go from there (this is what I did). I also had to bend the AC line a bit but not much at all. This step is where it'll likely differ for you. These are also photos I took after the install but they will give you a good idea of what needs to be cut and bent. Step 20 of the instructions says to cut the crash bar. Its not shown in any of my photos but I had to do this for my install. I recommend just doing it and saving the hassle. Its easy to cut and gives you more room for the piping Test fit and repeat cutting process Using a jack, slowly lift the cooler from under the car. Hold the top of the cooler and keep an eye for anywhere it is hitting. I highly recommend you tape up the IC before doing or else you risk scratching it if you're not careful. I didn't do this but I took my time when lifting the cooler and checked everywhere to make sure it wasn't interfering anywhere. Once you can lift it far enough that you can bolt the top of the IC in, do so. You can then lower the jack and inspect anywhere where the cooler is fouling. I had to cut some of the plastic where the old lower radiator mounts were. No one mentioned this anywhere so could just be me but figured I'd mention it. Install lower IC bracket Once you are happy with the fitment its time to install the lower brackets. Follow the image below for a reference because they don't give you any in the instructions. Bolt it on loosely and adjust the cooler till you're satisfied with its fitment. Once you're happy, tighten all the bolts. Now is a good time to tighten the top rad support brackets and double check the lower rad support bolts. You can also reinstall the horn and washer bottle now too. The piping! This part is a b%$@ch to do. All you need is time and patience. You shouldn't need to do any more cutting by this point. If you have the intune piping or similar design, my best advice is to ram that piping into the intercooler ends as far as you can. You shouldn't damage the inside of the IC cause it won't go that far, just get them in there as far as you can! Cut all your Plastic parts This part doesn't need any images, just follow the plazzy instructions on what to cut as they explain it pretty well. A lot of people remove the lower rock guard so they don't have to cut it. I did it the long way and cut mine so I could keep the guard. This is where my images end because I followed the plazzy instructions afterwards. They do an alright job at explaining the piping and cutting plastic job but if you have questions just ask below! Reinstall bumper Check all piping clamps are tight. Reinstall the lights and the bumper and then stand back and admire your work. You did good!
-
Hey guys, Recently ive bought a xr6t Ute with a few mods to it (plenum, under battery intake, exhaust cooler, injectors actuator tune etc.) Dyno sheets say its sitting around the 450hpatw mark I found the other day I was into it and then needed to brake quickly after and the brakes were like spongy (had to stand on them to stop) Just wondering if this is an issue or if it has something to do with oil pressures? It currently does not have a surge tan to my knowledge... I really don't want to break this thing!! Cheers,
-
Hey all, In before I'm told to take it to a shop - I'm stubborn and plan on doing it myself because its best way to learn! My plazmaman 1000HP intercooler is arriving this week after a long and patient wait! Cars already got the antz battery relo and intake kit, and intune motorsports IC piping. I know I need some silicone reducers for the piping to fit, pretty sure the intune kit came with some but I've lost them 🤷♂️ The plazmaman site states the cooler will fit all their piping kits, and I figure that because the IC piping kits on the market are all so similar that the Intune piping I have should be fine. My actual reason for this thread is that I'm chasing some tips, photos, etc on the install of the cooler. I want to have as much info as I can before tackling the job cause I've been told its on the more difficult side. Some research on the forum says the same thing. Anyone out there that can lend some of their knowledge would be greatly appreciated! Cheers all!
-
So, I'm BACK! I finally decided it was time to mod the old girl. I dropped my '10 F6 that has 160,000km on the clock into ASG Motorsports on the Gold Coast for Aaron to finish what I started, and tune the old girl. I did the following... Tog 4" exhaust 460 intank pump 1125cc injectors Plaz 1000hp cooler kit Plaz Cai Plaz Battery relo Ported exhaust housing 12.5psi actuator Hi-Flow thermo ASG did the following... Turbo Oil feed line Tranny cooler ZF steel pan and service Plaz HD valve springs Then we encountered a problem. My exhaust cam was rooted. The usual FG wear, so I decided to go Atomic Stage 4. We've had some discussion (aaron my tuner, and I) and seeing as though the car has 160,000 on the clock and we've put HD valve springs in, now might be a good time to replace the cam chain, tensioner & sprocket. Seeing as though the front cover needs to come off to do this, we're going to do the oil pump gears too. Whats peoples thoughts on anything else being done while it's apart? The only other thing I can think of was maybe head studs, in case I decide to push the power up in the future?


-
Hi im trying to fit my plazmaman stage 2 intercooler piping kit and CAI kit along with a mishimoto intercooler (same size as plaz one supplied in intercooler kit) for my BA XR6T I was wondering if anyone can help me out with some fitting instructions or point me in the right direction. Cheers
-
Hi peoples and merry christmas . Just wondering if anyone has any pics or tips installing a plazmaman cai ? Mines on its way ( picked it up near new for 250 ) not sure how easy or hard it will be as there is bugger all room . If no one posts I'll put up my dealings for any newbies ( like me ) if anyone wants a look ......
-
Hey just wanting to buy a plenum and wondering what brand to got with. I am about to replace my HDI front mount with a process west stage 2 core and a single 3.5 "exhaust. I currently have HDI front mount ,process west under the battery intake and cross over ,after market dump pipe ,forged rods and pistons ,turbo smart plumb back BOV.
-
I'm tossing up between a few intakes, I am leaning more towards the plazmaman intake. https://www.plazmaman.com/cms/html/view_main.php?img=tuner%20Challenge%206.jpg&des=F934...%20FG%20AIR%20Muffler%20Replacement%20pipe From my limited knowledge and research this seems like one of the best available, what can you guys recommend??