RUS531
Legacy Donating Member
-
Joined
-
Last visited
Everything posted by RUS531
-
Hi guys, Here's a link to a post in my engine build thread where I explain how I relocated my battery in my ute. Cheers Cameron.
-
Ok so its been a while so its about time for an update. My engine is about to came back from atomic as a 698 Long motor with a race girdle. I'm still waiting on my Plazmaman Polished Plenum and Plaz-to-Niz Piping, talked to Chris the other day and hopefully it will be here very shortly. I bought a process west CAI which looks the goods. I couldn't wait and had to test fit it. The size of the filter is huge in diameter. The website shows a filter that looks like a K&N. but mine came with a big UNI filter unit. This brings me to my next point. The battery Relocation. I cant justify the cost of the Battery relocation kits on the market, and personally do not like the position where the battery ends up. Ie in behind the bumper or under the plenum. I know Plazmaman position theirs un the air box which I reckon besides the cost, is the better of the options. So anyway I bought a battery box and did it myself. The ute factor in this process makes it pretty easy because you have a whole heap of space to work with... So I mounted the Battery box in the tray securing it with 3/8th bolts rather than the strap it was supplied with. Finding the right location was easy but not as straight forward as you might think. I had to find a position that would allow me to bolt it through steel that is under the plastic and not through the reinforcement that run across underside of the tray. Jack one side of the ute up, put it on stands and have a look around. Here is where mine ended up. As you can see the lid is held on buy elastic loops which I bought from a local upholster (thanks gravelrash) Behind the box is two 25mm hole where I ran the cables through Cable..... While each to their own and some might think this is over kill, I used 50mm2 welding flex. This stuff is double insulated, can handle more current than my stereo and car can draw, and should hopefully offer LITTLE/NO voltage drop between the battery and the front of the car. Ok the front of the car. I went a local auto lecky and got a red and black 10mm insulated stud. Fixed them to a similar place process west mounts theirs. The factory battery terminals are crap to say the least.... sure they do the job but don't offer flexibility to add other cables. So I cut them off and replaced them with 25mm2x10mm lugs. Most decent battery terminals with have a 10mm stud with a wing nut or a 10mm bolt in them so if I go back to factory I only have to bolt these lugs to the new terminals I am using on the batter anyway. For those who have seen my thread on the hard lid lights, I have run the new +Ve cable the same way. That is through the chassis rail. This offers and easy route and more importantly mechanical protection for the cable. The -Ve is terminated at the front at the Black insulated post and the factory ground point for the engine. At the tray I simply terminated at the battery and a bolt underneath that secures the tray to the chassis via a 10mm Bolt The most important thing about doing a battery relocation is cable protection. You are moving your battery further away from the starter motor which mean more cable has no over current protection... you do not want your battery shorting out. It could cost you more than a new battery. Also don't run two cables to your battery (+ & -) Your car is one big conductor so ground at the body and keep the cables short. If do your could end up with starting problems due to an increase in resistance. Any way that's my rant. enjoy


-
Doin a surf through ebay and come across THIS, anyone seen or used them. Could be a crok-of-sH1t but I'll thought I would throw it out there Cheers Cameron
-
Like the title says, does the FG rocker cover garnish fit the BA/BF rocker cover (when used with an aftermarket plenum)? I'm not sure if this has been asked before or if any one has looked into it... It doesn't apear that the garnish has any cut outs like the earlier series.
-
Hey dude I just went to mitre10 today and got a polishing kit from them for about 50 bucks. It had a bit for your drill and to different wheels and two different polishing compounds, 1 for each wheel. Basically there is a main cutting one that removes scratches and inperfections then the soft one brings up the mirror shine. I just clamped a high speed drill to the bench and polished my thermostat housing today. Here is the kit I used With the housing, I did a little sanding and hit it with a scotchbrite pad before hitting with the polish
-
Thanks for the info senna. Well the motors been sent off on this morning's truck so I guess it should be there by Friday (I live in CQ). So it won't be long before I have an assessment on what needs to be done on the motor :locked:
-
Welcome!! lol. this seems to be a trend at the moment. Yeah big difference hey? But you have to ask yourself do you want this to happen again?
-
I'm not 100% sure if he gets the stock housing and modifies it for the ones he stocks, but from what he told me you can send in your oil pump for an upgrade in which he changes the oil pump gears and modifies the housing (I believe that includes the pressure relief and circuitry) It was around the 800 mark to get yours upgraded or 1000-1200 (I can't remember exactly) for a brand new unit
-
True! About time ford did this. I've sold the ute in the thread mentioned so now I have to do it all again. My new one has a AWC fiberglass lid so this should be interesting....
-
Just give brad a ring he will have all the info/gear you need, he's great to talk to. They do complete pump assemblies and can upgrade the originals.
-
nice work! Save yourself from this again and get brad from atomic to hook you up with a new pump, they are expensive but if you plan on keeping the car its piece of mine I reckon. I don't know how many you would find second hand.
-
lol "Crack Tester" Well the motor is all wrapped up and strapped to pallet ready to be sent away tomorrow, and I gave the engine bay a but of a clean today with some degreaser and soap. I also ran some degreaser through the bottom half of the intake manifold to get the deposits of oil out then tipped it out but didn't wash it, just sealed her up with some foil tape.
-
sweet thanks mate. I will most likely Bolt nearly every thing back on and install the sensors before she goes back in. If you take your exhaust housing off you will be able to see any major cracks, well I could. If you look on the yellow pages website seach non-destructive testing I think it is. I'm not sure on price but we have CCI pope come out to work and do testing on large equipment.
-
hey baf6 which way did you turn it out of curiosity?
-
Thanks for the tips Brett, I only took the Inlet manifold off as it made it easier to get to things and take other stuff off as I had to wait for a hoist. The Lift point on the intake side was spaced out with a couple of big nuts, with the gasket still in place to protect the machined surface on the head. The exhaust Manifold was left on. On the topic of the Clutch, does anyone know where I can get the alignment tool from or as brett said an input shaft. I was thinking of asking the local ford dealer if I could borrow theirs but I will as the local mechanics too. I'm going to wrap it up and strap it to a pallet tomorrow and organise it to be sent on Monday
-
Yeah don't know mate... Keep us updated though!
-
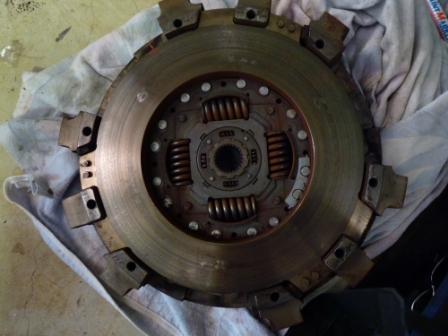
Thanks for the suggestion Blueprintbullet Matt, that doesn't sound good mate. Does your starter motor try to engage? There isn't a safety feature that I know of. What sort of noise did you hear? P.S Here are some new pictures. The clutch. I don't what difference it will make but I marked the clutch assembly and fly wheel. with a paint pen so it can all go together the way it was. I also numbered all the bolts and holes. When lossening off I also did them bit by bit in a cross pattern. Here's a couple of pictures of the flywheel and the flywheel side friction plate and pressure plate. I wasn't going to bother taking it apart to look at the other plates. Tell me what you think cause I don't know much about clutches at all, however apart from the couple of bright spots I thought it looked pretty good. It has done 73000ks


-
Brad, This being my first time pulling an engine out, I'm no expert, however these are some things I found. The top bell housing bolts can be a real pain to undo if your car is on the ground and stands. I had to use two extensions and a uni on my socket to get to them. When lifting your engine off the mounts mine wanted to lift from one side first but then the other side eventually came off. Once this happened I supported the gear box with a bottle jack and wiggled the engine forward. Once I got a bit of a gap between the bell housing and the motor I got a BIG flat screw driver (that's all I had at the time) and used it to lever the engine away from the gearbox. I think once it got free of the spigot bearing it became easier, just take your time. As I said it is a VERY tight fit when the motor is just about out of the engine bay. If you found a way that is better or gives you some more room please share. If not, be very mindful of those solid break lines running across the top at the back. No I wont be pulling it apart any further due to I don't have the time before I go back to work and I want it fixed ASAP (I miss cruising in her ) and I really couldn't be bothered lol. If anyone else could add to this for myself and BAF6 that would be awesome guys! Cameron
-
Just an update.... The engine is now out and dam it was a tight fit... I don't know if it was because of the twin plate clutch on the F6's but there is no room between the firewall and the the top radiator support. I think its gonna be harder to get back in. For those who have done this before is there any special way you found to remove/replace the engine. On inspection of the engine mounts I found one that looks a bit ratty on the top with cracks in the rubber. This one happened to be on the drivers side so I'm thinking that the heat had something to do with it. The opposite side looks perfect so I will just replace the one. Cameron
-
Ok, I talking to rotomaster today regarding a new turbine housing and they quoted about $850. This housing is a direct replacement for the standard housing but with a few minor changes to pass the ford patents. It apparently isn't the new FG housing as they aren't allowed to sell them any more. The reason why they were selling them is because had excess stock, hence why garret are making their own now with the few minor cosmetic differences. The new housing is also made of the new compound and has the bigger flapper/port. A new actuator and adjustable arm is $100 bucks. Which brings me to my next question... What will the adjustable arm let me do for boost control? Or is it just there so when the turbo is back together you can set the flapper closed, like a one size fits all job. A special thanks to Leigh from ETM for a bit of guidance in this area also.
-
Well I got it apart with some advice from Leigh and it appears that I have three of the holes cracked with some small cracks around the waste gate port.... I guess Im up for a new housing... bummer
-
thanks matty! sounds like a plan.....if I can get this housing off... any ideas people?
-
No as both my oil pressure sender to the ecu and sender to my electronic gauge are in the same position it would be pretty unlikely that both of them failed at once, and as mentioned before there was a sound in the front of the timing case like gears not meshing properly. Brad from atomic said he as seen a few that have just damaged the inner rotor gear, which could mean for me a rebuilt pump instead of a new one. Basically I want something that will pull 400rwkw (give or take) every day comfortably, so I think I will be getting the girdle as well and by looking through threads I will need to do something with the waste gate. The other thing limiting me will be the clutch which will be done at a later stage. On another note I can't speak highly enough of brad and his willingness to help and answer my questions each time I've called.
-
Ok so I am back from my week at work, now to get stuck back into it. I went and saw a rental mob today and organised myself a 1200kg engine hoist for this week end for 5o bucks...bargin! So in the mean time I thought I would pull my turbo off to check if I had cracks in the exhaust housing due to bolts working their way out. I've taken it off and bolted it to a work bench and removed all the bolts except those at the oil return which can't come out with out fouling. Now how the hell do you get the housing loose??? Ive tried twisting the center assembly from the compressor end, carefully giving it a little tap with a rubber mallet but the thing wont budge. Any suggestions? Also I'm thinking its worth doing the port flapper and actuator mod, who is the people to see about this?
-
Here are some pics of my progress so far. As you can see I had a blown gasket on my turbo/dump pipe. When I first got this car I found that the flange was missing a couple of nuts on the waste-gate side, which I then replaced. This is obviously the result and you can see on the flange where the gasses have been escaping. I wonder how this would have affected my performance, spool times and boost control. I know that boost was creeping past its 14 pound setting (old owner told me about its tunes). I'm off to work for seven days starting tomorrow so she will have to wait to be hoisted out until then.