peter_125
-
Posts
11 -
Joined
-
Last visited
-
How To Make A Custom Fibreglass Subwoofer Box
peter_125 replied to peter_125's topic in Audio/Visual Workshop
yeah I got the spandex and spray adhesive from spotlight, the carpet and carpet adhesive from the local car audio shop and the rest from bunnings. Mines not anchored down but because its so snug it will not move no matter how fast I go around a corner, It just has never moved. Before I knew it wouldnt roll around I was considering velcro because I didnt want to screw through the body or destroy the carpet. If once your done it wants to tip over im sure velcro would do the trick -
Wow thanks for the detailed answer. I'm unsure if any of that's possible with a factory head unit is it?
-
Hey guys, Just a question regarding tuning my amp/sub. From the front seat I have the amp turned up high and it sounds great from the front seats, but in the back it droans a bit. With the amp turned down in the back seats it sounds great but very quiet in the front. The amp I have is 580w and im not 100% sure on the sub as it was second hand. Am I up for a newer more powerful sub or amp to get a clearer sound? Its running off a line out converter. I can rule out it being the box because ive had it in 3 different boxes and its sounded the same each time.
-
How To Make A Custom Fibreglass Subwoofer Box
peter_125 replied to peter_125's topic in Audio/Visual Workshop
thanks mate. Its just stuck there from the spandex on the front of it. I guess they work together, you screw threw the glass that's 4 layers thick that attached to the back and through the mdf that's braced fairly well -
Hey guys. I though it would do a wright up on how I made my moulded subwoofer box. I always wanted one that would fit in the right rear side of my bf's boot but I could only ever find left sided ones (They dont fit because of the factory amp), so since I broke my wrist and was off work I thought I would make my own. This was my first attempt at this and I have never fibreglassed before this so it may not be the perfect technique. You will need: - Masking take (blue painters tape is best as its less absorbent) - Tin foil - A few cheapo paint brushes - Plastic cups - Rubber gloves - Small measuring cup - Approx 2.5 x 1m off fibreglass matting and appropriate amount of resin - Catalist hardener - Resporator - Spandex,fleece of any stretchy material - Spray adhesive - Carpet - MDF - Glue - Time and money Tools for the job: - Jig saw - Grinder or similar - Drill Step 1: Get your masking tape together and start taping up the area you want your box to be, overlapping your tape. Make sure you tape a bit further than you actually want your box to start Step 2: Once you have taped the area well with no carpet to be seen, its time to add foil. You dont neccisarily have to use the foil but it gives the extra layer of protection from resign soaking through and its easier to release. Cut the foil up in to manageable squares, using large squares in flat spots and smaller in tighter areas. Try to over lap them and tape down each side. Step 3: Time for fibreglass.First of all place plastic/newspaper around the area you are glassing to make sure none gets on the carpet, it will never come off. Then cut or rip up your matting into manageable squares, around 100x100mm (can be bigger for flat spots). Make a good pile of ripped up matting that you can access easily. Time to mix up the resign and catalyst. Read the directions as to how much hardener/catalyst ratio is needed, its usually between 2-5% depending on the tempreture, And make sure you have enough for the job you are doing. To give you an idea the first layer I did I used about 350ml. Grab your brush and start brushing on a thick coat of resign onto and area (not the whole thing) Then place a piece of matting over the top, then dab more resign over the top untill its trasparent. The reason you dab it on is because if you brush it you displace all the fibres and it makes a mess and creates air bubbles (bad). Continue this process overlapping each piece of mat you put on, and make sure you do this quick enough before your resign hardens up (I put to much hardener in the first time I mixed it, it would be easier to put less that whats recomended so you get enough time to get it right) and make sure you glass well past where you want to box to start. Once your first layer is all glassed up leave it an hour or so. Step 4: Do another layer using the same teqnique, then allow to dry for an hour or 2 (the longer the better in this case). Step 5: Now you can remove it from the boot. Make sure its dry and strong enough before considering it. Onces its out start removing the tin foil and tape (I sudgest you wear gloves while doing this). Some wont come off but that's shouldnt matter, its only the back. Step 6: Now add another 2/3 layers. Its heaps easier now its out of the boot. You can see in the picture about there is a few spots of missed, if you find these fix them up by doing a double layer over them. Layer 3 Layer 4 Step 7: Now your base is thick enough you can start cutting it into the shape you want. Some people say use a jig saw but I found it much easier to use a grinder with a cutting disk. Test fit it as your cutting to see how it fits. Step 8: Now its time to mount your sub ring. Refer to the box or measure you sub to get the correct mounting size. If you have the box it may have a template to trace around. I made the ring using a table router to get it perfectly round but im sure there are plenty of ways to do it. I used 16mm MDF for the ring, the thicker the better. Now when mounting the ring, make sure its not obstructing the sub and not poking out past where your spandex will go (later step). I found it easier to start at the bottom, so it stays there when you cut in your other braces. I just used scrap timber lying around the shed, you can use anything. To fix it to the back I used a screw and glued with PVA, I later removed the screws. Once your ring is mounted at the bottom sit it in the boot to see what angle the ring is facing before cutting your other braces. Step 9: This is where you wrap the box in a stretchy material. I used spandex, it was very easy to get tight. Use spray adhesive around the edges of your box, attach the spandex to the top/bottom and stretch over and around the box sticking it down to the edges. Make sure its VERY tight, if not it will cause plenty of problems later. If you decide you dont like the shape once the spandex is on, remove it, change the shape of your box and try again. I did it and found the top left and bottom left corners where far to sharp so I curved them with a grinder with a grinding disk. Make sure there are no wrinkles in the spandex and make sure its very firmly stuck down (I ran into trouble because I didnt stick it down well enough). It should look something like this. Step 10: Mix up resign and layer it over the spandex, don't push to hard and make sure it even, but not to thick or else it will sag. Here's where disaster struck with mine...By not sticking the spandex down properly it started to sag, come undone and masive wrinkles appeared. I managed to get most of it tight again while the resign was going off but some I couldnt get rid of. Once the resign hardened up I just used builders bog to fill up these wrinkles and it turned out perfect. Step 11: Now is a good time to test fit your box to see if it needs modification. Now to add a some layers over the resigned spandex once its hardened. Make sure you dont go over where the sub goes because it will make it difficult to cut out later. I did 3 layers total on the front. Step 12: You can now cut out the hole and the excess material at the back. I grinded the material off the back as it had resign on it it was fairly easy. To cut the hole open I just used a stanley knife. Once the hole is open and if you have some glass left over, inside the box join the spandex to the base, I did this for extra support. Give it a light sand removing any excess fibres and resign drips before carpeting Step 13: Time to carpet. Make sure the carpet you get it stretchy, or else you wont have a hope of getting it on properly (car audio shops sells the right stuff). The adhesive I sudgest using is the one pictured above. I bought it from a car audio shop and I can see why, it works perfectly. Spray the box and carpet and stretch it all over and around, it may be a battle but just keep stretching it untill all the wrinkles are gone. Then simply cut the hole out with a stanley knife. And that's it! The final product: Fits well and sound great. Let me know if I have left anything out or if you have any questions feel free to ask. Peter
-
Heres how mines coming along
-
hey guys, im attempting a corner moulded one tomorrow. Just wondering if I can put 2 layers down in the boot, then let it dry then pop it out and put more layers on even if its dry?
-
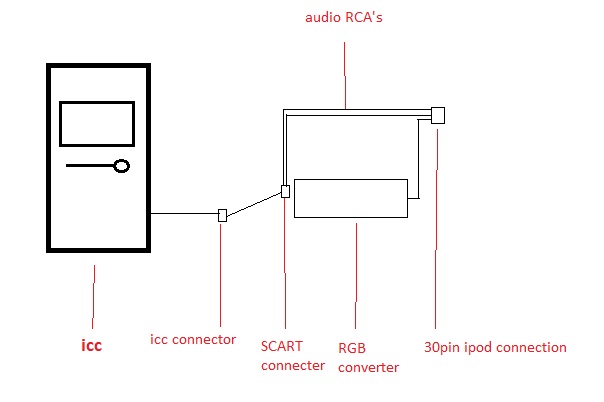
Hey everyone. After scurrying pages and pages of this forum category looking for info on how to exactly connect video output devices to the factory screen, I still haven't seen one explaining ipod connection. From what I've gathered from ways to input dvd players, tv's and sat navs I understand an RGB converter is needed. What I was wondering from you guys that have connected video devices to stock screen is whether this would work? If this works the 30 pin connecter can also be made to charge your iphone/ipod. So if you guys believe this will work im prepared to give it a crack. Cheers, Peter

-
its fairly fiddley, I did my xr sedan not long ago with the factory head unit. You need a line out converter to convert speaker wire into RCA's, then the remote wire comes from your cig lighter. Have a look around for some threads, that's what I did.
-
Ultimate Iphone Integration Setup On Ba/bf Premium Icc
peter_125 replied to [XRS1X]'s topic in Audio/Visual Workshop
what cost are we looking at without the touch screen overlay and just video output? -
it sounds like the polarity is reversed on the side without bass